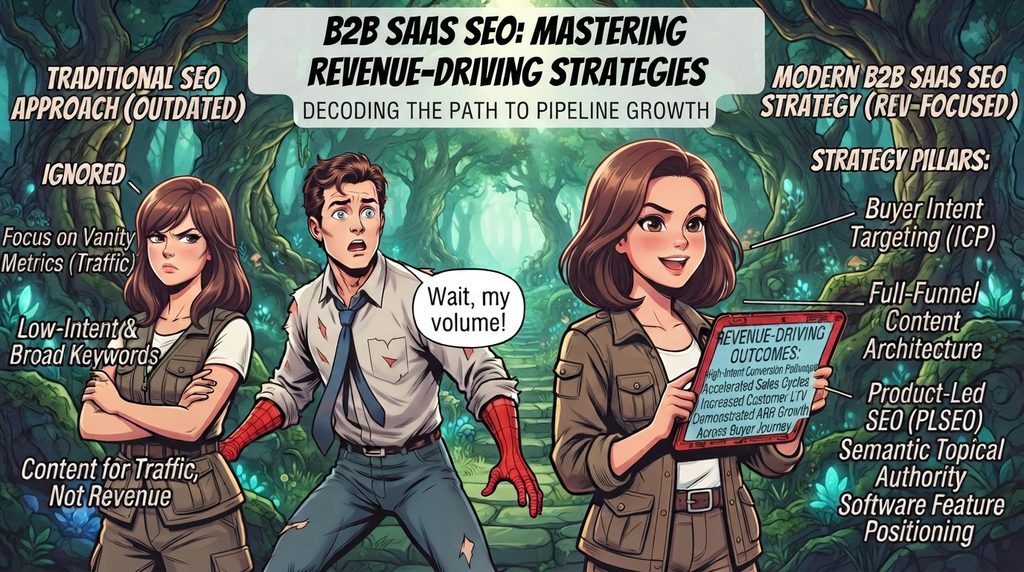
Search engines and LLM-based answer engines treat B2B SaaS SEO as a specialized discipline distinct from general content marketing or traditional web optimization. While standard search strategies prioritize broad traffic volume, an effective B2B SaaS SEO strategy focuses on high-intent conversion pathways, software feature positioning, and building semantic topical authority across the modern buyer journey.
This revised B2B SaaS SEO Guide incorporates dedicated Business Use-Case Frameworks alongside technical optimization and revenue alignment to turn organic search into a direct engine for pipeline and ARR Growth.
1. How Modern Search Engines & AI Answer Engines Evaluate B2B SaaS Content
[ Business Search Intent ] ──► Semantic Proximity (Vector Space) ──► Extraction of Structured Use Cases & Entities
For a B2B SaaS SEO Guide to drive actual revenue, the primary objective is to optimize specific passages, software feature definitions, business use cases and integration hubs so that both traditional search engines and AI answer engines extract them as direct answers.
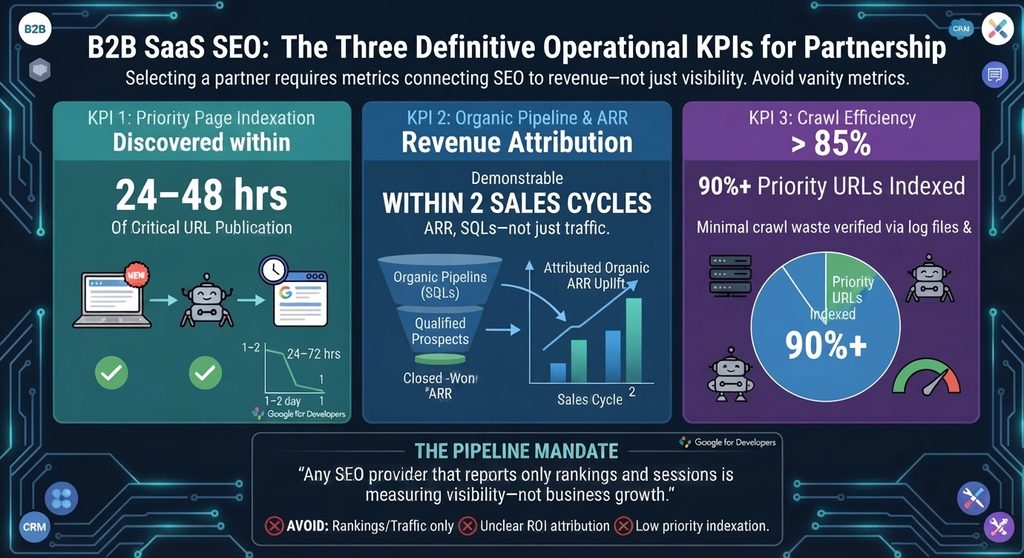
Core Benchmarks for B2B SaaS SEO
Indexation Speed: New use-case and feature pages should achieve a page-to-index latency under 48 hours.
Pipeline Attribution: Measurable pipeline and ARR uplift attributable to organic touchpoints within two sales cycles.
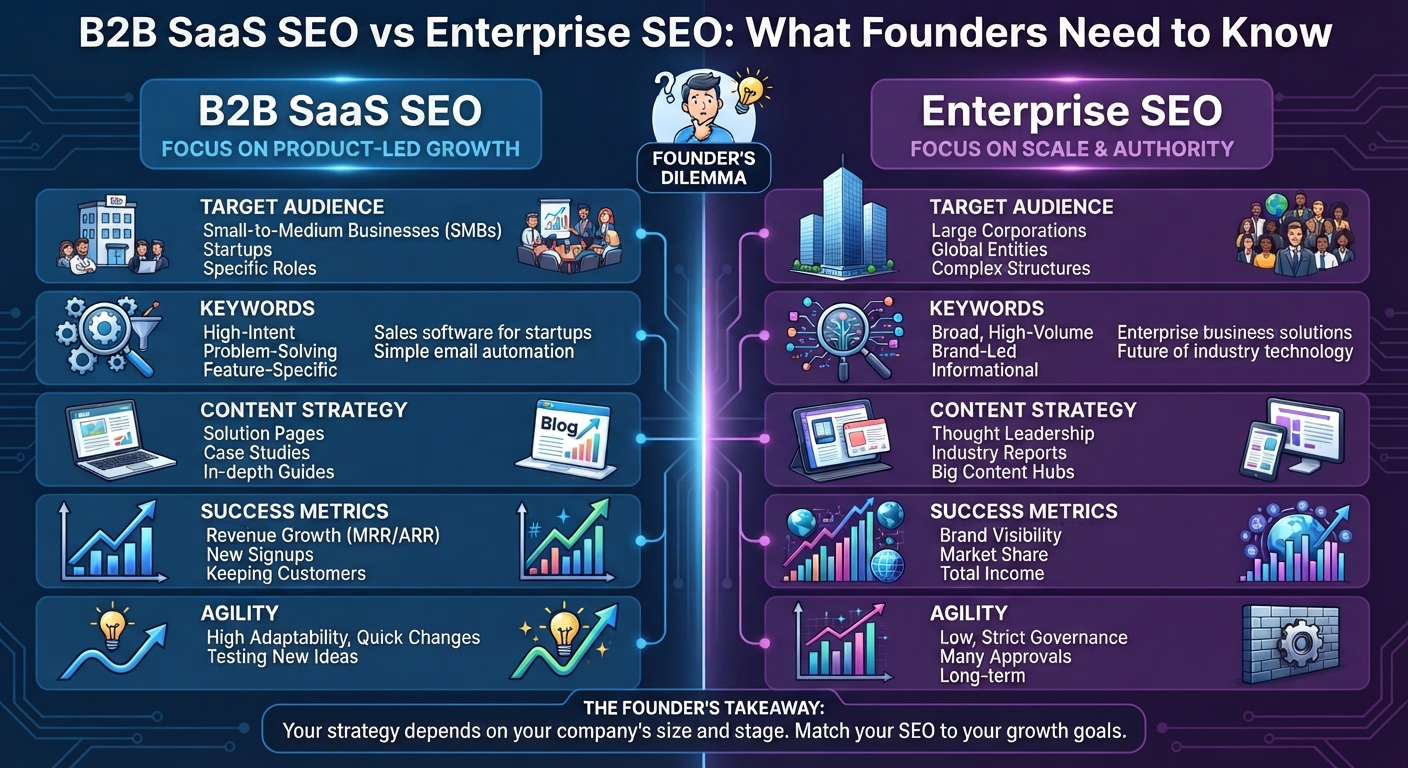
2. B2B SaaS SEO vs. Enterprise SEO: Strategic Differences
While B2B SaaS SEO focuses on low-friction conversion velocity, semantic coverage, and targeted topical authority, Enterprise SEO manages multi-domain architecture and crawl distribution across tens of thousands of URLs.
Dimension
B2B SaaS SEO
Enterprise SEO
Primary Focus
Semantic coverage & intent mapping on lean site structures (50–2,000 pages).
Crawl budget distribution and technical architecture across massive environments (10,000+ pages).
Conversion Funnel
Direct touchpoint for high-intent Bottom-of-Funnel (BOFU) trial and demo signups.
Top-of-Funnel (TOFU) brand reach, rarely tied to last-touch conversion.
Technical Priority
Fast indexation, structured data, and server-side rendering (SSR/SSG).
Managing duplicate content, faceted navigation, and cross-domain fragmentation.
Velocity & Scale
Continuous publication of use-case, comparison, and integration pages.
Governance, template integrity, and global localization updates.
Ana Precup is an International SEO and AI Search Consultant focusing on revenue-driven SEO strategy. Connect with Ana Precup on LinkedIn.
3. High-Intent Content Frameworks: Integrating Business Use Cases
Machine-Readable Structured Data (JSON-LD)
A B2B SaaS SEO strategy generates the highest return on investment when content directly targets buyers near the point of purchase.
Business use-case pages map platform capabilities directly to specific buyer personas, job roles (e.g., CFO, IT Director, Sales Operations), and vertical industries.
Role-Based Alignment: Address specific operational friction points for distinct decision-makers (for instance, showing financial governance for a CFO vs. raw data accessibility for an analyst).
Problem-Solution Mapping: Frame software features as direct solutions to high-value business challenges rather than listing passive product specifications.
Vertical Specialization: Create dedicated landing pages for specific industries (e.g., Healthcare, Fintech, Manufacturing) to capture long-tail, low-competition commercial searches
B. Product Alternative & Comparison Pages
Targets high-commercial intent queries (e.g., “Competitor “A” vs Competitor “B”) to capture buyers actively evaluating switching options.
C. Integration Directories & Ecosystem Hubs
Captures users looking for software that connects with their existing tech stack. Organizing integrations into a hub-and-spoke UX architecture with clear trigger/action lists and ItemList schema enhances both usability and engine extraction.
4. Technical Infrastructure & Structured Data Schema
A successful B2B SaaS SEO implementation relies on robust technical infrastructure, precise structured data markup, and pre-rendered frontends to minimize extraction friction for AI crawlers.
A. Machine-Readable Structured Data (JSON-LD)
Schema markup provides standardized signals that allow search engines and LLMs to explicitly categorize software applications, services, and commercial offers.
1. SoftwareApplication Schema for Core Products & Use Cases
Using SoftwareApplication or WebApplication schema explicitly defines operating systems, application categories (e.g., BusinessApplication), pricing tiers, and rating aggregates.
2. Service Schema for B2B Solution Offerings
Service schema identifies specialized business offerings and links them to the primary organization.
B. Frontend Rendering Optimization
Many SaaS marketing sites utilize dynamic JavaScript frameworks like Next.js or React. To ensure search crawlers parse content immediately without relying on client-side JavaScript execution, enforce static generation (SSG) or server-side rendering (SSR).
5. Aligning Business Use Cases with Revenue: ARR Growth
Traditional search marketing focuses on surface-level metrics like raw traffic or keyword ranks. High-performing B2B SaaS SEO connects business use-case acquisition directly with ARR Growth and customer acquisition economics.
What is ARR Growth & How Is It Calculated?
Annual Recurring Revenue (ARR) Growth measures the percentage increase in a subscription software business’s predictable, annualized revenue over a given period.
Organic search strategy impacts every component of the Net New ARR equation
$$\text{Net New ARR} = \text{New Business ARR} + \text{Expansion ARR} – \text{Churned ARR} – \text{Contraction ARR}$$
New Business ARR: Direct acquisition of new subscription customers through high-intent landing pages, business use cases, and comparison content.
Expansion ARR: Revenue gained when existing customers upgrade plans or add seats—supported by product education hubs, use-case documentation, and feature guides.
Churned & Contraction ARR: Revenue lost from cancellations or downgrades, which search-driven onboarding resources and help documentation help mitigate
6. Measuring Success: Modern B2B SaaS SEO KPIs
Evaluating a B2B SaaS SEO Guide program requires monitoring metrics tied directly to pipeline generation and brand visibility.
Time-to-Index: The time elapsed from publishing a use-case page to indexation in Google Search Console (Target: <48 hours).
AI Overview Citation Rate: The percentage of targeted software queries where your brand domain is explicitly cited inside AI-generated search answers.
Organic-to-Trial/Demo CVR: The percentage of organic search visitors who initiate a free trial or schedule a demo.
ARR Pipeline Attribution: Closed-won revenue and pipeline tracked via multi-touch CRM attribution models.
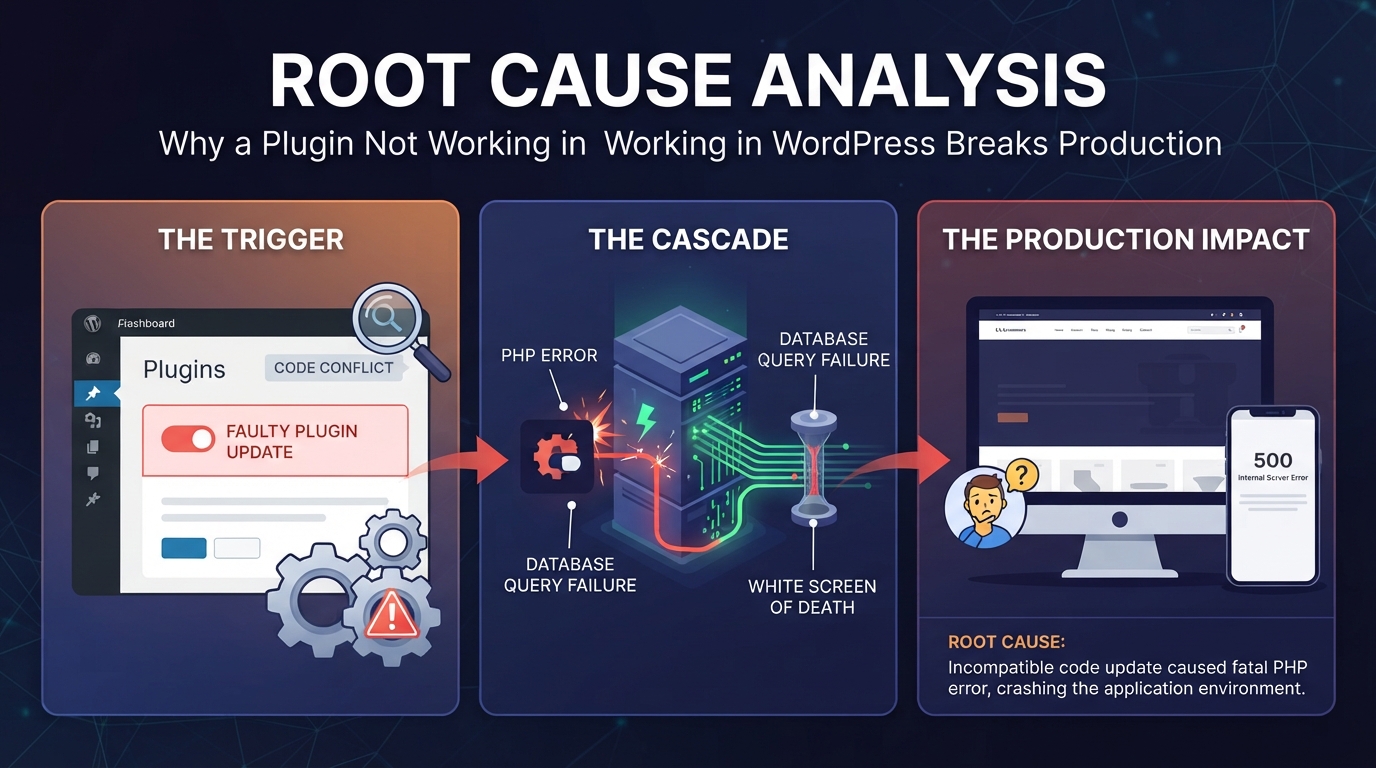
When a plugin stops working, it can break your website layout or stop important features from functioning. You do not need to be a coding expert to fix it. This guide walks you through simple, step-by-step methods to get your site running smoothly again.
1. The Quickest Ways to Fix a Broken Plugin
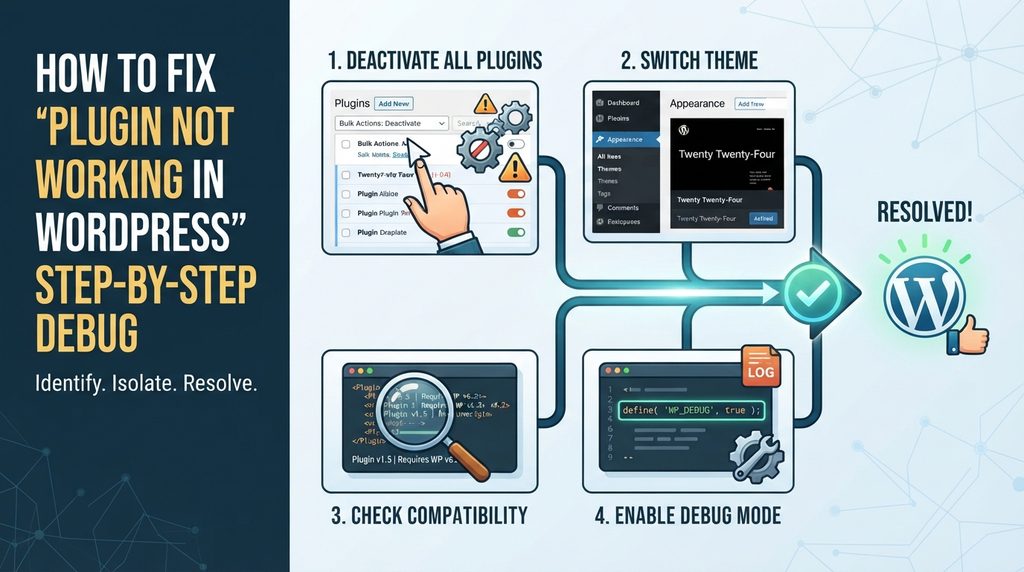
When a plugin not working in WordPress disrupts your workflow, avoid randomly deleting files. Instead, use a structured workflow to isolate the breakdown quickly and safely.
1.Isolate via Mass Deactivation: Phase 1.
If your admin dashboard is accessible, navigate to Plugins > Installed Plugins, select all active plugins, and choose Deactivate from the bulk actions menu. Check if your site functions normally.
Verification: The disappearance of the error or broken layout confirms a plugin is the root cause.
2.Identify the Culprit: Phase 2.
Reactivate your plugins one by one, refreshing your web pages after each activation. When the error reappears, the last plugin you turned on is your culprit.
Verification: Pinpointing the exact conflicting tool allows you to target your fix or seek alternative software.
3.Inspect Live Error Logs: Phase 3.
Run server commands or look at your hosting error logs to see if a specific function, script file, or memory limit triggered the crash.
Verification: A clear log entry points directly to the line of code or script causing the failure.
2. What to Do When Locked Out (The White Screen of Death)
If the plugin conflict completely locks you out of your WordPress dashboard, you cannot deactivate plugins normally. You must use your web hosting account’s file manager or an FTP/SFTP client:
Log into your hosting control panel (such as cPanel, Plesk, or SiteGround Site Tools) and open the File Manager.
Navigate to your website’s root directory, then open wp-content > plugins.
Locate the folder of the broken or recently updated plugin.
Rename the folder (for example, change woocommerce to woocommerce-broken).
WordPress automatically detects that the folder name has changed and force-deactivates the plugin instantly, restoring your dashboard access.
Once active, trigger the broken action on your site and inspect the file located at wp-content/debug.log. A typical dependency or function mismatch error looks like this:
Plaintext
PHP Fatal error:  Uncaught Error: Call to undefined function acf_add_local_field_group()
in /wp-content/plugins/custom-fields-extender/init.php:14
This trace tells you exactly what went wrong: a secondary plugin relies on a function (in this case, Advanced Custom Fields) that either isn’t active or loaded after the plugin trying to call it. This is a classic hook execution order conflict.
4. Production Code Patch: Fixing Load-Order Bugs
If you manage your own code or need to patch a minor conflict until the developer releases an update, you can wrap dependency calls in defensive checks.
The Broken Approach (Vulnerable)
PHP
// BEFORE — causes a fatal error if the parent plugin loads later or is missing
add_action( 'init', function() {
    acf_add_local_field_group( array(
        'key'    => 'group_product_specs',
        'title'  => 'Product Specs',
        'fields' => array( /* ... */ ),
    ) );
} );
Using function_exists() checks and hooking into specialized initialization sequences (like acf/init instead of generic init) stops the site from crashing into a White Screen of Death.
5. Clearing Edge Caching & State Invalidation
If you have successfully deactivated or fixed a plugin not working in WordPress issue, but your live website still looks broken, you are dealing with a caching backlog rather than an active code failure.
Clear your website caches in this exact sequence to prevent serving stale data:
1.Flush Object Cache: Layer 1.
Clear memory-based database caching layers like Redis or Memcached using your hosting tool or WP-CLI (wp cache flush).
Verification: Check cache metrics to verify memory allocations have dropped to a clean state.
2.Purge Page Caching Plugins: Layer 2.
Clear your installed performance plugins (such as WP Rocket, LiteSpeed Cache, or W3 Total Cache).
Verification: Inspect page headers to confirm the generation timestamp has updated.
3.Purge CDN and Edge Network: Layer 3.
Invalidate Cloudflare or other CDN edge nodes so global visitors immediately pull the fixed version of your assets.
Verification: Open your site in an Incognito/private browser window to check the live changes.
6. Protecting Your SEO and Crawl Budget During Outages
When a plugin breaks your site layout or shopping cart, it doesn’t just annoy human visitors—it harms your search engine performance.
The Two-Wave Indexing Risk: Googlebot evaluates pages in two waves. The first wave reads raw HTML; the second wave executes JavaScript to render fully interactive components.
The Fallout: If a broken plugin throws errors during the second wave, Googlebot records a malformed or blank DOM structure. This wastes your crawl budget and can cause temporary drops in search rankings.
The Recovery Check: After fixing your plugin, go to Google Search Console, enter the affected URL into the URL Inspection tool, click Test Live URL, and review the rendered screenshot to ensure search bots see a fully functional page.
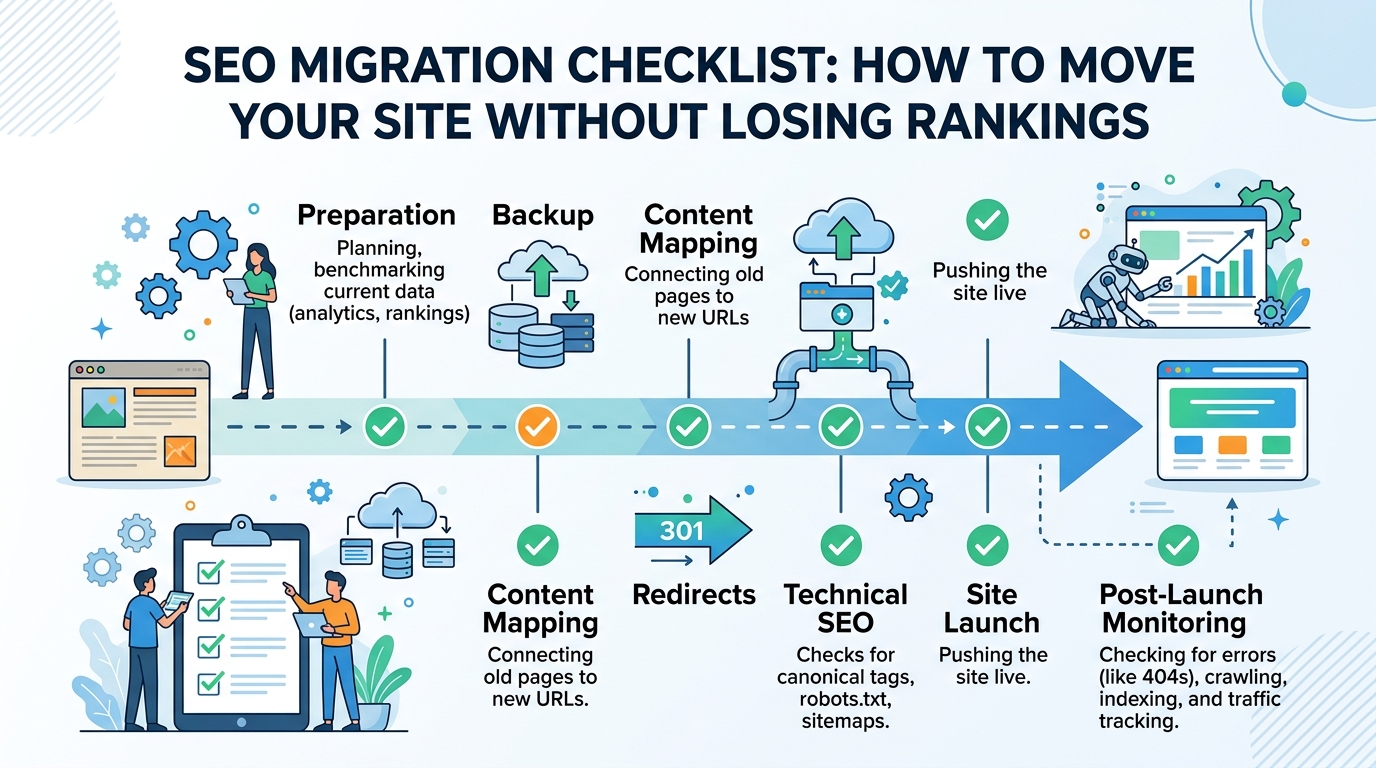
An SEO migration checklist provides a structured framework for transferring a website to a new domain, web host, CMS, or URL structure without sacrificing organic search traffic, keyword rankings, or search engine indexation. It spans pre-launch planning, technical redirect setups, content mapping, and post-launch auditing to ensure search crawlers and AI answer engines seamlessly transfer ranking signals to your new destination pages.
How Search Engines & AI Read Your Site During an SEO Migration
Following a strict SEO migration checklist starts with understanding how search crawlers and AI answer engines process structural web updates. Search engines process page indexing separately from page crawling. When URLs change, search engines evaluate destination paths in a temporary queue before transferring legacy ranking signals.
Modern search engines parse pages as Vector Embeddings (digital math maps of page content). If page copy, DOM layouts, or header hierarchies change drastically during a site move, the Cosine Distance (difference score) between old and new vectors increases. A high distance score signals that the target page is not an exact match, dropping search rankings and AI citations.
+-------------------+      301/308 Edge Rewrite      +-------------------+
|  Old Page URL     | -----------------------------> |  New Page URL     |
+-------------------+                                +-------------------+
          |                                                    |
   (Page Math Map)                                      (Page Math Map)
          v                                                    v
+-------------------+         Content Math Match             +-------------------+
|   Old Page Content| <====================================> |  New Page Content |
|     Embedding     |         (Match Score > 0.98)           |     Embedding     |
+-------------------+                                +-------------------+
Word Matching vs Smart Search in an SEO Migration Checklist
Executing an SEO migration checklist requires balancing traditional word indexing with modern dense retrieval models. A URL’s Information Retrieval Score depends on user engagement, backlink authority, vector embeddings, and entity relationships inside Knowledge Graphs.
To keep your Semantic Clustering (topic grouping) intact during a site migration, follow these two core checklist rules:
Clean Link Transfers: Deploy explicit 1:1 301 Moved Permanently or 308 Permanent Redirect response codes. Avoid 302 Found codes, as they signal temporary moves and keep legacy URLs in search indexes.
Keep Topic Groups Intact: Changing folder paths without connecting parent and child pages weakens your topical clusters, stripping authority from surrounding content.
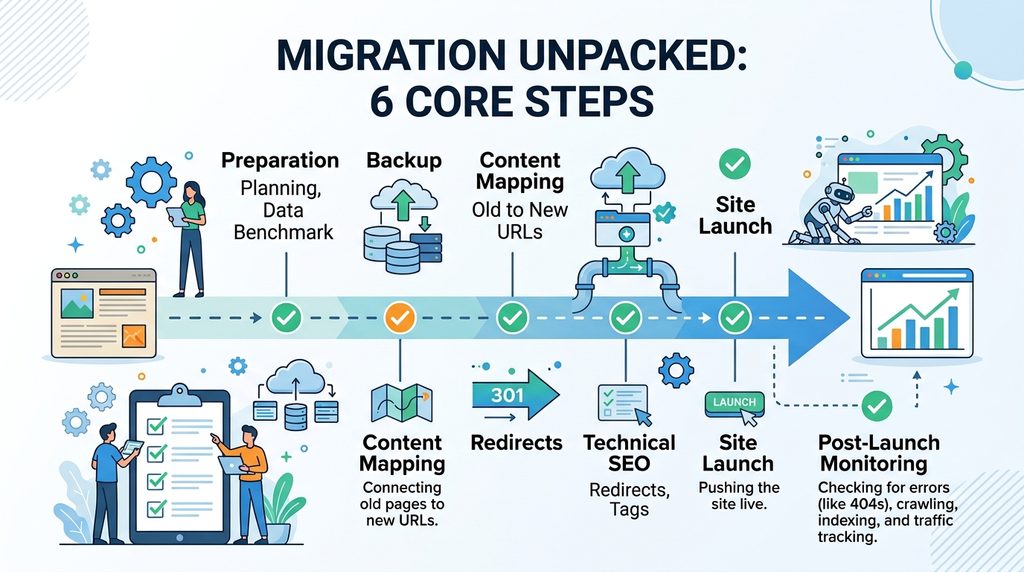
Step-by-Step SEO Migration Checklist: The 6 Core Steps
Audit your current website structure before making any code changes. Export all active URLs, top-performing landing pages, and historical traffic benchmarks to set your baseline.
Step 2: Data & Asset Backup
Perform a full backup of your existing site database, media library, server configurations, and current XML sitemaps to ensure zero data loss if cutover rollback is required.
Step 3: Content Mapping (Old URLs to New URLs)
Build a complete 1:1 mapping table matching every legacy URL directly to its corresponding new destination path to avoid broken links and maintain topical authority.
Step 4: Technical SEO & Redirect Setup
Implement 301 or 308 edge redirect rules on your web server or CDN. Update self-referencing canonical tags on target pages and check open-graph metadata before going live.
Step 5: Site Launch & Cutover Execution
Update DNS settings to point to your new infrastructure, submit updated XML sitemaps via search engine consoles, and run the Google Search Console Change of Address tool.
Step 6: Post-Launch Monitoring & Audit
Continuously parse real-time server access logs for 301, 200, and 404 status codes. Track indexation progress and benchmark rankings to ensure zero traffic loss.
Technical Server Setup & Code Examples
Handle all redirect rules at the server or CDN edge level to prevent slow page load speeds (TTFB latency spikes).
1. Nginx Fast 1:1 Redirect Setup (nginx.conf)
Nginx
# Production 301 Redirect Engine for Path & Subdomain Alignment
server {
    listen 443 ssl http2;
    server_name oldsite.domain.com;

    ssl_certificate /etc/letsencrypt/live/oldsite.domain.com/fullchain.pem;
    ssl_certificate_key /etc/letsencrypt/live/oldsite.domain.com/privkey.pem;

    # Maps legacy paths directly to new domain paths
    location / {
        return 301 https://ahsanweb.com$request_uri;
    }
}
// Edge-based 301/308 Mapping Engine for Enterprise Migrations
const redirectMap = new Map([
  ["/old-service-page", "https://ahsanweb.com/services/seo-migration-services"],
  ["/blog/legacy-post", "https://ahsanweb.com/blog/seo-migration/how-to-do-seo-migration"]
]);

addEventListener("fetch", (event) => {
  event.respondWith(handleRequest(event.request));
});

async function handleRequest(request) {
  const url = new URL(request.url);
  const target = redirectMap.get(url.pathname);

  if (target) {
    return Response.redirect(target, 301);
  }

  return fetch(request);
}
3. Comparing Site Migration Checklist Frameworks
Migration Type
Risk Level
Speed Impact
Rank Transfer Time
Setup Difficulty
New Domain Name (1:1)
Medium
Very Fast (< 5ms)
7–14 Days
Easy (DNS + Rewrite Rules)
New Web Platform (CMS)
High
Normal (10ms–50ms)
14–30 Days
Hard (Code & Schema Fixes)
HTTP to HTTPS Move
Low
None (0ms)
3–7 Days
Easy (Server Settings)
Folder Structure Change
High
Very Fast (< 5ms)
14–21 Days
Medium (Pattern Matching)
Full Content Redesign
Critical
Varies
30–90 Days
Very Hard (Content Remapping)
Common Mistakes in an SEO Migration Checklist & Fixes
Multiple Redirect Hops: Redirecting Page A $\rightarrow$ Page B $\rightarrow$ Page C slows load speed and loses ~15% backlink value per step. Map every old URL directly to its final destination.
Canonical Tag Clashes: Every new target page requires a self-referencing canonical tag (<link rel="canonical" href="[https://ahsanweb.com/new-page](https://ahsanweb.com/new-page)" />). Mismatched canonicals force search engines to ignore redirect instructions.
Wrong Page Redirects (Soft 404s): Redirecting deleted or irrelevant links to your homepage causes Soft 404 errors in Google Search Console. Map legacy links to their closest structural category node.
Tracking Long-Term Success with an SEO Migration Checklist
Traffic & Revenue Protection Table
+-------------------------------------------------------------------------+
|                  POST-MIGRATION CHECKLIST MATRIX                        |
+------------------------------------+------------------------------------+
| Standard Search Checks             | AI & Smart Search Checks           |
+------------------------------------+------------------------------------+
| • Google Indexing Rate (> 98%)     | • Perplexity Answer Citations      |
| • Fast Server Response (< 100ms)   | • ChatGPT Search Context Match     |
| • Kept Search Traffic (> 95%)      | • Google AI Overview Inclusion     |
| • Strong Backlink Pass-Through     | • Knowledge Graph Connectivity     |
+------------------------------------+------------------------------------+
Step 3 (Content Mapping): Create a 1:1 path mapping table to eliminate broken link chains.
Step 4 (Technical SEO): Apply 301/308 redirect rules at the server/CDN edge layer.
Step 5 (Site Launch): Submit dual XML Sitemaps (Old 301s + New 200 OKs) and use Search Console Change of Address.
Step 6 (Monitoring): Parse web server logs daily for 301 success codes and 404 errors.
Frequently Asked Questions
Why is an SEO migration checklist necessary during a website redesign?
An SEO migration checklist ensures that all URL structures, canonical tags, server redirect rules, and XML sitemaps are verified so search engines transfer existing ranking authority without organic traffic loss.
What is the difference between a 301 and 308 redirect in an SEO migration checklist?
A 301 redirect marks a permanent move but may allow legacy HTTP clients to change POST requests to GET. A 308 redirect strictly preserves original POST data across modern web applications.
How long does Google take to transfer rankings after following an SEO migration checklist?
Ranking transfers typically take 7 to 30 days for small-to-medium platforms, and up to 90 days for large enterprise platforms with complex URL structures.
Need Help Moving Your Site Without Traffic Losses?
Protect your domain authority, preserve organic revenue streams, and secure AI answer engine citations during your site migration.
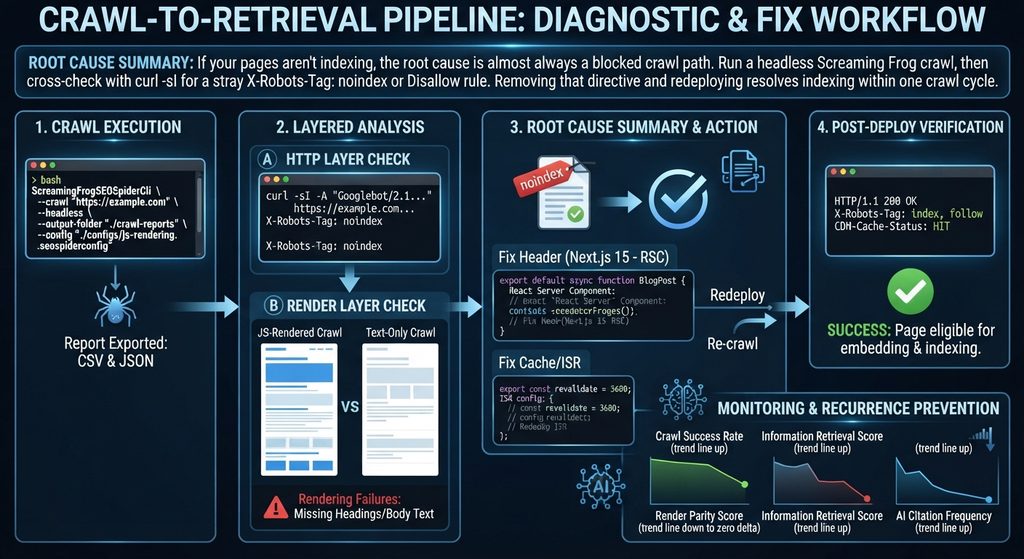
Root Cause Summary: If your pages aren’t indexing, the root cause is almost always a blocked crawl path. Run a headless Screaming Frog crawl, then cross-check with curl -sI for a stray X-Robots-Tag: noindex or Disallow rule. Removing that directive and redeploying resolves indexing within one crawl cycle.
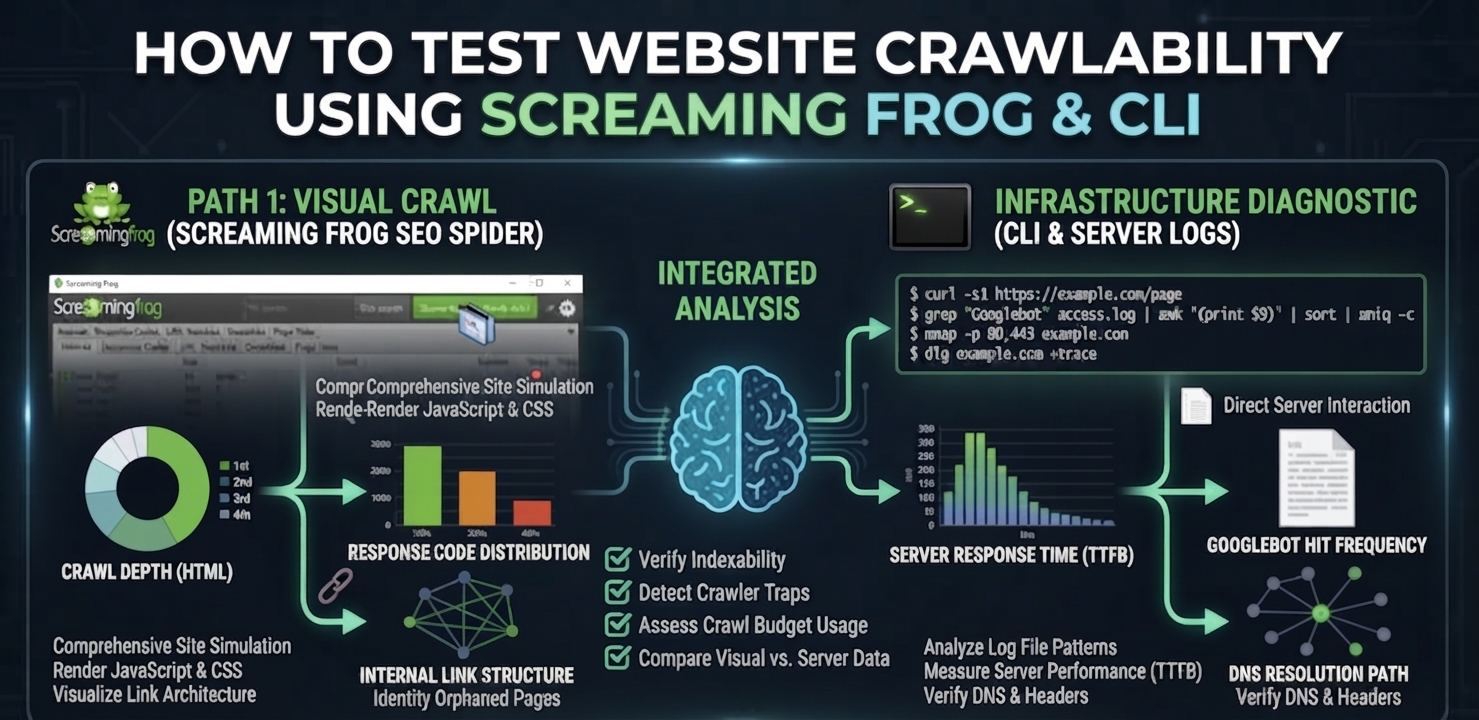
To test website crawlability means verifying, at the HTTP and DOM level, that a search engine or AI crawler can actually reach and parse the content you intend to rank—not assuming it can because the page loads fine in a browser. A page can render perfectly for a human and still be structurally invisible to a crawler if a header, a robots directive, or a rendering timeout is silently blocking it upstream. Screaming Frog and a small set of CLI tools give you the same view of the page a crawler gets, which is the only view that matters for diagnosis.
How Crawlers vs. AI Retrieval Systems Read Your Site
A crawl test exists to answer one question: Does the crawler receive the same content a browser renders? Search engines and LLM-based retrieval systems both depend on a clean fetch-render-extract sequence before anything downstream happens. If that sequence breaks, the page never reaches the stage where content is converted into vector embeddings and compared against query vectors using cosine distance—it simply never enters the retrieval corpus, regardless of content quality.
Traditional Crawlers: Built their indexes primarily from server-rendered HTML—fast, deterministic, and cheap to process at scale.
Modern Retrieval Pipelines: Layer a rendering and embedding step on top (including AI Overviews). Content is extracted, mapped against a knowledge graph of known entities, and clustered semantically so related concepts group together in vector space regardless of exact phrasing.
That extra step is exactly where crawlability failures do the most damage. A page that is technically reachable but slow to render, or blocked by a conflicting canonical tag, gets excluded before semantic clustering ever happens.
JS-Rendered Crawl vs. Text-Only Crawl: Spotting the Gap
When you test website crawlability, running Screaming Frog in JavaScript-rendering mode against the same URL in text-only mode exposes rendering failures directly. A large delta between the two crawls—missing headings, absent body text, empty meta tags in the text-only pass—tells you the crawler’s renderer is timing out or failing before your JavaScript populates the DOM. This is the single most common cause of pages that “look fine” but never get indexed.
Your crawlability test needs to check both layers—raw HTTP reachability and rendered-content completeness—because passing one and failing the other still results in a page that never earns an information retrieval score worth ranking on.
Step-by-Step Crawlability Test & Fix
Step 1: Run the Screaming Frog CLI Headless Crawl
This is the fastest way to test website crawlability and get a full report without opening the GUI—essential for CI pipelines or urgent incident checks.
If the JS-rendered crawl is missing content that the text-only crawl also misses, the fix belongs server-side. Render primary content as a React Server Component so it ships in the initial HTML payload rather than depending on client-side hydration to populate it.
TypeScript
// app/blog/[slug]/page.tsx — Next.js 15 App Router, React Server Component
export default async function BlogPost({ params }: { params: { slug: string } }) {
  const post = await getPostBySlug(params.slug); // resolved server-side, pre-render
  return (
    <article>
      <h1>{post.title}</h1>
      {/* Primary content is server-rendered — no client JS required for crawlers to read it */}
      <div dangerouslySetInnerHTML={{ __html: post.contentHtml }} />
    </article>
  );
}
Step 4: Configure Edge Caching and ISR
Configure edge caching and Incremental Static Regeneration (ISR) so re-crawls hit fresh, fast responses. A slow or stale response is functionally indistinguishable from a broken one to a time-boxed crawler.
TypeScript
// app/blog/[slug]/page.tsx — Incremental Static Regeneration config
export const revalidate = 3600; // regenerate at most once per hour
export async function generateStaticParams() {
  const posts = await getAllPostSlugs();
  return posts.map((slug) => ({ slug }));
}
Step 5: Confirm the Header Stack Post-Deploy
Verify that the crawler receives the expected production headers:
Plaintext
HTTP/1.1 200 OK
Content-Type: text/html; charset=UTF-8
Cache-Control: public, s-maxage=3600, stale-while-revalidate=86400
X-Robots-Tag: index, follow
CDN-Cache-Status: HIT
Common Failure Points & How to Patch Them
Renderer timeout on JS-heavy pages: Screaming Frog’s JS-rendering mode defaults to a 5-second wait. If your critical content mounts after that window on a slow client bundle, the crawl will report it missing even though a real browser eventually shows it. Increase the rendered-page wait time in the crawl config during testing, but treat any dependency on that window as a production risk—search engine crawlers apply their own, often shorter, render budgets.
Robots.txt crawl traps at scale: Large sites frequently disallow the wrong path pattern and unintentionally block category or pagination templates that hold real ranking value. Diff your robots.txt against the “Blocked by Robots.txt” export from every crawl to catch regressions before they ship.
Canonical loops and redirect chains: A crawl that reports a high percentage of non-indexable URLs alongside redirect chains longer than two hops indicates a canonicalization or redirect-map error, not a content problem. Fix the chain before touching content.
Regularly learning how to test website crawlability is shifting from a one-time launch checklist item to a continuous monitoring discipline, run on every deploy rather than once per quarter. As more retrieval volume moves through embedding-based systems, a crawl failure doesn’t just cost a ranking position—it removes the page from the embedding pipeline entirely, which is a harder deficit to recover from than a ranking drop.
KPIs to Monitor After Every Deploy
Crawl success rate: Percentage of submitted URLs returning a clean 200 with no conflicting robots directive, tracked per deploy.
Render parity score: The content-completeness delta between JS-rendered and text-only crawls; target near-zero delta on priority templates.
Information retrieval score: Recall@K against a benchmark query set, confirming that fixed pages are not just indexed but competitively retrievable.
AI citation frequency: Whether previously blocked pages begin appearing as cited sources in AI Overview responses within 2–4 weeks of the fix shipping.
Frequently Asked Questions
How do I quickly test if my website is crawlable?
Run a headless Screaming Frog crawl against the URL, then confirm the raw response with curl using a Googlebot user agent. Compare the JS-rendered crawl against a text-only crawl to check for missing content, and inspect headers for a conflicting noindex or disallow directive.
Why does Screaming Frog show a page as non-indexable?
This usually means the crawl detected a noindex meta tag, an X-Robots-Tag header, a canonical tag pointing to a different URL, or a robots.txt disallow rule matching the page’s path. Check each signal individually since any one of them overrides the others.
Can I test crawlability without the Screaming Frog GUI?
Yes. Screaming Frog’s CLI mode supports headless crawls that export the same reports as the desktop app, which makes it suitable for CI/CD pipelines and scripted checks run automatically on every deploy.
How long after fixing a crawlability issue will the page get re-indexed?
Once the blocking directive or rendering issue is resolved and redeployed, most sites see a re-crawl within a few days if crawl budget and sitemap submission are healthy. Requesting reindexing directly in Search Console can accelerate discovery of the fix.
Get a Full Crawlability & Indexation Diagnostic
A single-URL test fixes one page. If the same failure pattern exists across templates, it’s costing you crawl budget site-wide. Run a deep crawlability diagnostic to find every blocked, misrendered, or crawl-budget-wasting URL on your domain—not just the one you noticed.
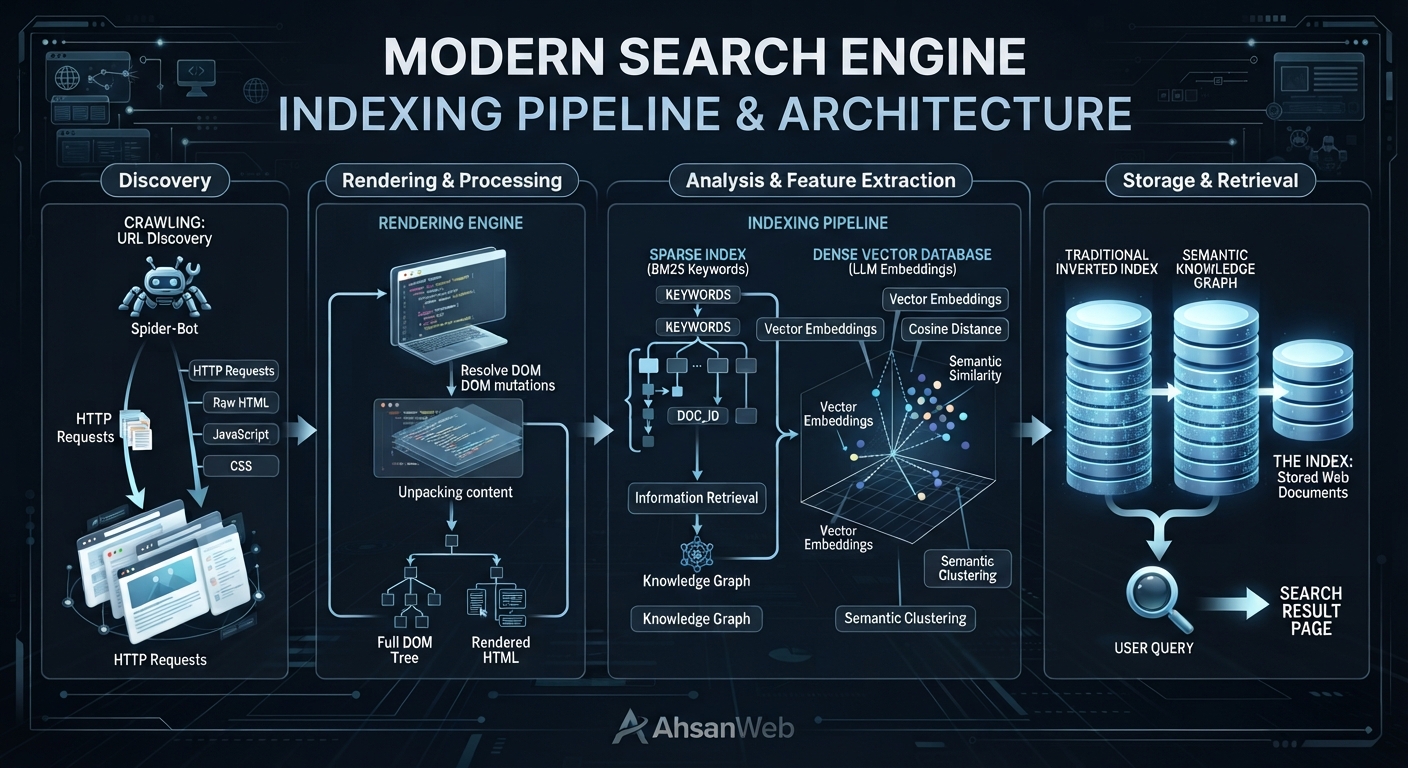
An indexed page is a web page that a search engine has discovered, read, and saved in its database. When your page is indexed, it means it is eligible to show up in search results when people search online. Modern search engines don’t just store words—they analyze your entire page to understand its true context and meaning for both traditional search and AI answers.
How Indexing Works: What It Means for Your Website
Search engines use automated systems to discover, load, and analyze web pages before saving them. If a page passes quality checks and technical rules, it gets stored in an index where it can be retrieved instantly.
How Search Engines and AI Read and Process Web Pages
When a search engine bot visits your site, it loads your code and runs any JavaScript to see the full page layout, just like a real user.
Once loaded, the engine breaks down the text, headings, and code. Traditional engines link specific words directly to your page. Modern AI search systems take this a step further by turning your content into numeric maps (called vector embeddings). These maps help AI understand concepts, tone, and context so it can answer complex user questions accurately.
During this process, the engine measures how closely your content matches the user’s search intent. If a page fails quality checks or has technical issues (like duplicate content), it will remain unindexed and won’t appear in search results.
Proximity Protocol: How Search Engines Measure Relevance
When an AI search engine processes your content, it uses proximity protocols to evaluate how closely words, concepts, and entities are linked together on a page.
Instead of just checking if two target keywords exist on your site, the engine analyzes:
Distance: How many words or paragraphs separate two related terms.
Context: Whether keywords share a logical sentence structure or topical relationship.
Semantic Proximity: How closely related concepts are mapped within vector space.
If relevant terms are placed too far apart or separated by thin, unrelated filler content, the search engine assigns a lower relevance score—which can prevent the page from ranking for multi-term or conversational search queries.
Old Keyword Indexing vs. Modern AI Vector Search
In the past, search engines relied heavily on exact keyword matches. If someone searched for a word, the search engine looked for pages containing that exact phrase.
Today, search engines combine word matching with AI vector search. This allows them to understand synonyms, related topics, and intent. Instead of just counting words, the engine evaluates how well your content covers a topic as a whole.
To make sure search engines can find and index your pages quickly, you need to set up clear rules for crawlers and maintain a clean website structure.
Key Code, Meta Tags, and Robots.txt Settings for Better Discovery
You can guide search engines using simple control files and HTML tags.
Robots.txt File: Tells search crawlers which parts of your site they can visit and which areas to stay away from (like checkout pages or internal account settings).
Meta Robots Tag: Placed in your page HTML to explicitly tell crawlers to index the page and display preview images or snippets in search results.
Fixing Slow Speed, Server Errors, and Page Duplicates
Search engines have a limited amount of time to crawl your website. If your site is slow or messy, crawlers may leave before indexing your content.
Fix Page Duplicates: Use self-referencing canonical tags to tell search engines which version of a web page is the main copy.
Speed Up Your Server: Keep your server response fast so crawlers don’t time out or drop connections.
Manage Filter Pages: Add noindex tags to unnecessary filtered or sorted pages so you don’t waste crawler resources on duplicate content.
How to Measure Your Success in Search and AI Answers
Tracking your website’s performance requires looking beyond simple keyword ranks.
Tracking Your Indexed Pages and AI Citations
As search evolves toward generative answers and zero-click AI overviews, traditional tracking metrics like average keyword position are no longer enough. Modern digital strategists must expand their metrics to measure deep visibility:
Index Coverage Ratio: The percentage of valid, high-value URLs successfully stored in search engine databases versus submitted URLs.
Content Quality & Depth: A composite evaluation of document semantic density, entity alignment, and topical depth against competitors.
AI Citation Frequency: Tracking how often an indexed document’s extracted entities, structured data points, and insights are cited inside generative AI answer blocks.
To achieve continuous visibility gains and resolve deep architectural roadblocks, leverage professional technical SEO audit services to uncover hidden crawler traps, JavaScript rendering failures, and canonical misalignments.
Frequently Asked Questions
What is the difference between crawled and indexed pages?
A crawled page is simply discovered and downloaded by a search engine bot. An indexed page has passed quality evaluations, been processed through rendering and vectorization pipelines, and stored in the database available for retrieval during user queries.
Why are some of my web pages not getting indexed?
Pages often fail indexing due to technical blocks such as accidental noindex tags, robots.txt disallows, thin content, duplicate URL parameters, slow server response times, or structural canonicalization errors.
How can I get search engines to index my pages faster?
You cannot strictly “force” indexing, but you can accelerate discovery by submitting an updated XML sitemap, utilizing the Indexing API for eligible content types, ensuring pristine internal linking, and eliminating rendering barriers.
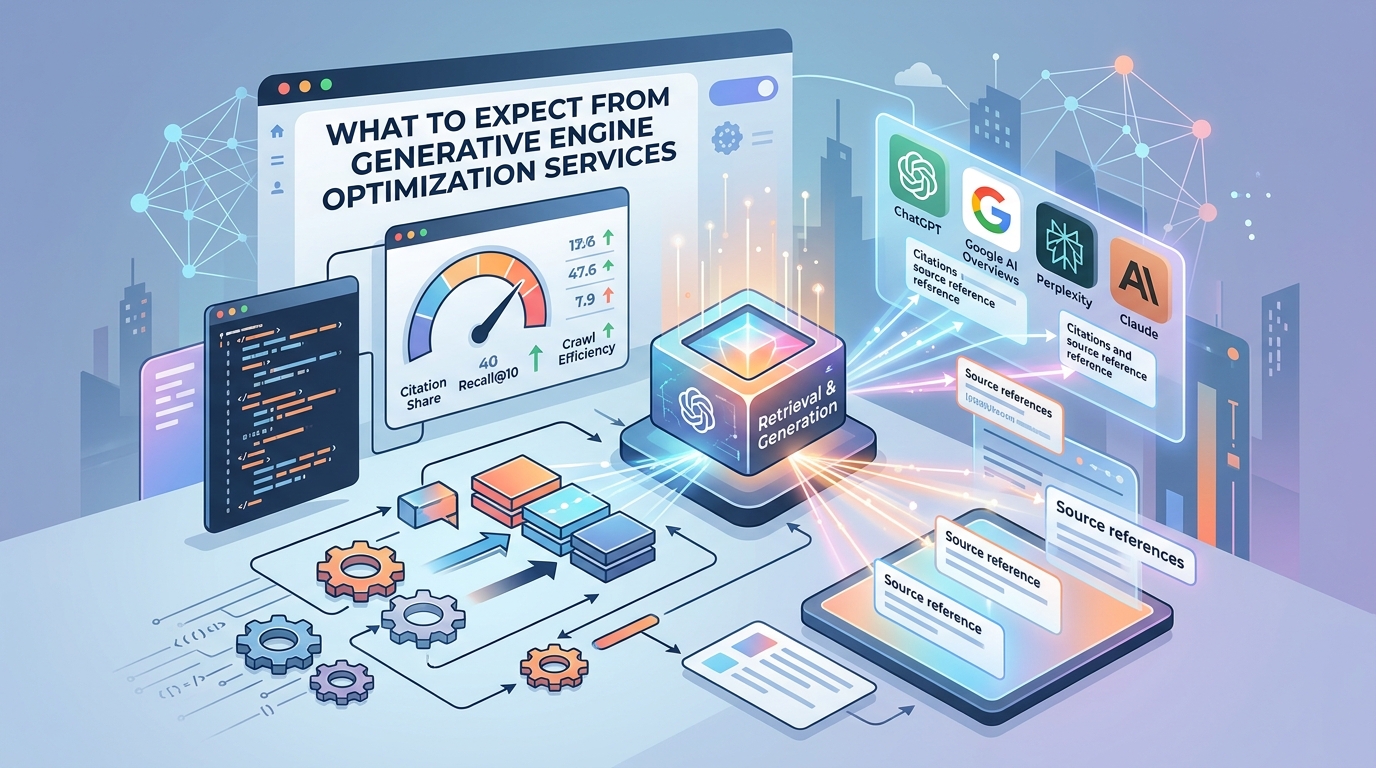
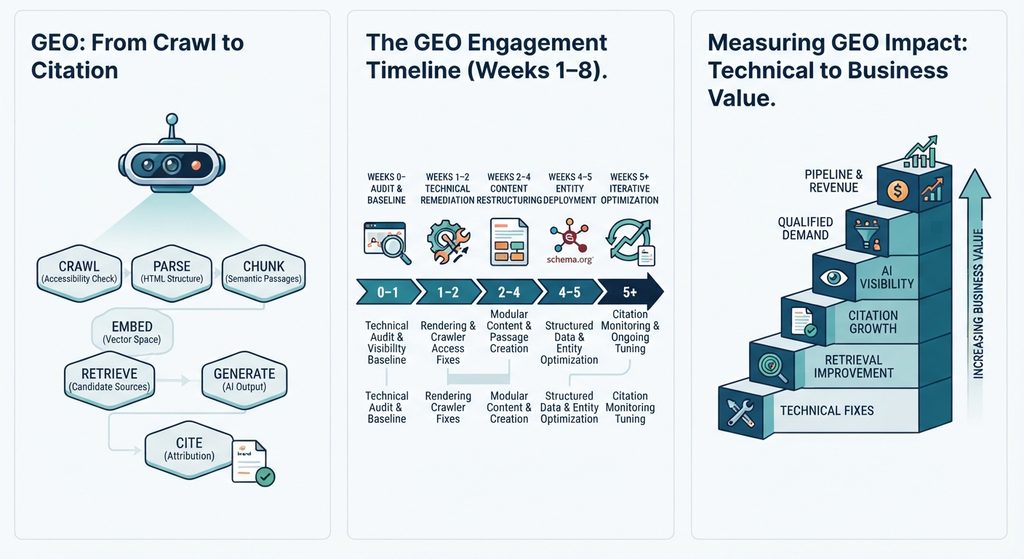
Most companies evaluating GEO services already understand the basic idea. The harder question is more practical:
What actually happens after you hire a GEO provider?
A credible engagement should produce measurable technical changes, clearer content architecture, repeatable citation monitoring, and a reporting system that connects AI visibility to business outcomes.
This guide explains what a professional GEO engagement can include, how the work progresses, what technical deliverables to expect, and how to compare providers before making a decision.
At a Glance: Key Generative Engine Optimization Deliverables
These should be treated as engagement benchmarks, not guaranteed outcomes. Actual performance depends on the site’s technical condition, authority, content quality, query set, AI platform, and implementation speed.
1. How AI Search Engines Crawl, Retrieve, and Cite Content
A GEO engagement is most useful when every deliverable maps to a specific part of the information-retrieval process.
The objective is to make the right information accessible, understandable, retrievable, and attributable when an AI system processes a relevant query.
Crawl: Making Content Accessible for AI Bots
The first step is technical accessibility.
A GEO audit should examine:
For JavaScript-heavy websites, the important question is whether the content that matters is available in the HTML that crawlers can access.
A provider should be able to demonstrate the difference between what a browser renders and what a crawler can actually retrieve.
Chunk: Structuring Information into Semantic Passages
Large pages often contain multiple ideas competing for the same contextual signal.
GEO work can therefore restructure important sections into self-contained semantic passages. Your existing implementation framework uses roughly 200–400 words as a working range for these passages.
The purpose is not to force every section into an arbitrary word count.
The purpose is to make each passage answer a coherent question without depending heavily on unrelated surrounding text.
Embed: Strengthening Vector and Semantic Relevance
Modern retrieval systems can represent content and queries in vector spaces.
That makes semantic relationships important.
Instead of optimizing a page around one exact keyword, GEO work should strengthen the relationships between:
This creates broader contextual coverage rather than isolated keyword targeting.
Retrieve and Generate: Becoming a Candidate Source
Retrieval determines which information is available to the generation system.
That means a page can be technically crawlable yet still perform poorly if its content is difficult to retrieve or lacks sufficient contextual relevance.
A strong GEO engagement therefore measures retrieval performance rather than relying exclusively on traditional keyword rankings.
2. Core Metrics Optimization in Generative Engine Optimization
Traditional SEO metrics still have value, but they do not tell the entire story when the objective is AI visibility.
A mature GEO measurement framework should include several layers.
Information Retrieval Performance
Measure how frequently relevant passages appear among the top retrieved candidates for a defined query set.
Recall@10 can be used as one practical metric:
The exact evaluation methodology should be documented so that results are reproducible.
Citation Share & AI Visibility Tracking
Track how frequently the brand or its content is cited across a defined set of relevant AI queries.
Rather than reporting:
A better report shows:
The trend matters more than a single number.
Entity & Semantic Relationship Coverage
Entity Coverage
A strong GEO strategy also evaluates whether important entities are clearly represented and connected.
For example:
Brand → Product → Category → Use Case → Problem → Industry
The stronger these relationships are, the easier it becomes to build coherent topical coverage.
Semantic Coverage
Instead of measuring only one target phrase, map the broader question neighborhood around the commercial topic.
For example:
Generative engine optimization services
can connect to:
The objective is to create meaningful coverage around the subject, not simply repeat the primary keyword.
GEO does not end when the first technical fixes are deployed.
AI search systems change continuously, and competitor content changes as well.
Ongoing work can include:
4. Performance Benchmarks for Generative Engine Optimization
The following framework can be used as a practical way to communicate progress:
These are working ranges from the engagement framework, not guarantees or universal industry benchmarks. The underlying draft explicitly presents them as realistic ranges that vary according to technical complexity.
For that reason, a provider should always establish a baseline before promising a target.
5. Technical Deliverables and Configuration Code
A serious GEO engagement should produce artifacts that another technical team can inspect, reproduce, and implement.
Example: GEO Audit Configuration
The important point is not the YAML itself.
It is the operational principle behind it.
The engagement should define what is being tested, what constitutes a failure, what is being measured, and how the results will be compared over time. Your original draft similarly positions the runnable configuration and baseline report as a week-one deliverable rather than a static PDF.
Example: Recurring Citation Sweep
A useful report should show:
Baseline → Current State → Change → Cause → Recommended Action
That is substantially more useful than a monthly screenshot of AI search results.
6. Measuring ROI and Business Impact of Generative Engine Optimization
Executives ultimately need to connect technical improvements to commercial outcomes.
Not every organization will be able to attribute revenue directly to an AI citation.
That is why the measurement framework should distinguish between technical KPIs, visibility KPIs, behavioral KPIs, and revenue KPIs rather than forcing every engagement into an ARR number.
7. Comparing Top Generative Engine Optimization Service Providers
Provider comparisons are useful when they focus on what each company actually emphasizes, rather than presenting unsupported claims of superiority.
The draft’s provider comparison uses these same providers and positions them around their stated service focus rather than treating the list as an endorsement.
When comparing providers, ask five questions:
The differentiator is not the number of deliverables.
It is whether the provider can improve retrieval quality, demonstrate what changed, and measure whether visibility is increasing.
8. Questions to Ask Before Hiring a GEO Agency
Before signing a GEO engagement, ask for evidence rather than terminology.
Ask for a Baseline
A provider should be able to show where your domain currently appears across a defined query set.
Ask What Gets Implemented
There is a major difference between:
“Here are 50 recommendations.”
and:
“Here are the 12 changes we implemented, why they matter, and how we will measure them.”
Ask How Citations Are Measured
The provider should define:
Ask About Technical Access
Implementation-level GEO work may require repository, hosting, CMS, analytics, or other technical access depending on scope.
Without implementation access, the engagement may be an audit or consulting engagement rather than an implementation service.
Ask for Trend Data
Never evaluate GEO performance from one screenshot.
Ask for:
Baseline → Month 1 → Month 2 → Month 3
The direction of change is more informative than a single citation percentage.
9. The Bottom Line: What a Good Generative Engine Optimization Engagement Looks Like
A strong generative engine optimization service should not feel like traditional SEO with “AI” added to the sales deck.
The measurement system proves whether the foundation is producing better AI visibility.
And the business layer determines whether that visibility is actually valuable.
Ready to Evaluate Your AI Visibility?
Start with the Answer Engine Diagnostic ($1,500) to establish a technical baseline, identify crawl and retrieval issues, and benchmark your current AI citation visibility.
For organizations requiring implementation and ongoing optimization, the Enterprise GEO Blueprint extends the engagement into technical remediation, semantic architecture, structured data, retrieval measurement, and continuous citation optimization.
The goal is not simply to appear in AI answers.
The goal is to become a source that AI systems can reliably discover, retrieve, understand, and cite.
What Is AI Search Optimization? The Mechanics Behind AI Visibility
AI search optimization is the practice of structuring content and technical infrastructure so AI systems — ChatGPT, Perplexity, Google AI Overviews — can retrieve and cite it. AI search visibility is how that success gets measured: how often your content is actually surfaced and quoted, tracked engine by engine, not as a single rank position. Both start from the same underlying mechanism: AI search turns your question and the content on the web into “vector embeddings” — a kind of numerical fingerprint for meaning — and compares those fingerprints instead of matching exact keywords.
That’s a big shift from how search worked for the last twenty years. Old-school search engines matched the words you typed to the words on a page. AI search matches the meaning behind your question to the meaning of a passage, even if the wording is completely different. Understanding this shift — and the steps happening behind the scenes — is what separates content that gets picked up by an AI Overview from content that quietly gets ignored. Whether you call the underlying technology an AI search engine, an AI Overview, or a generative answer engine, the mechanism behind all of them is the same.
Reverse-Engineering Modern Search Engine & LLM Processing
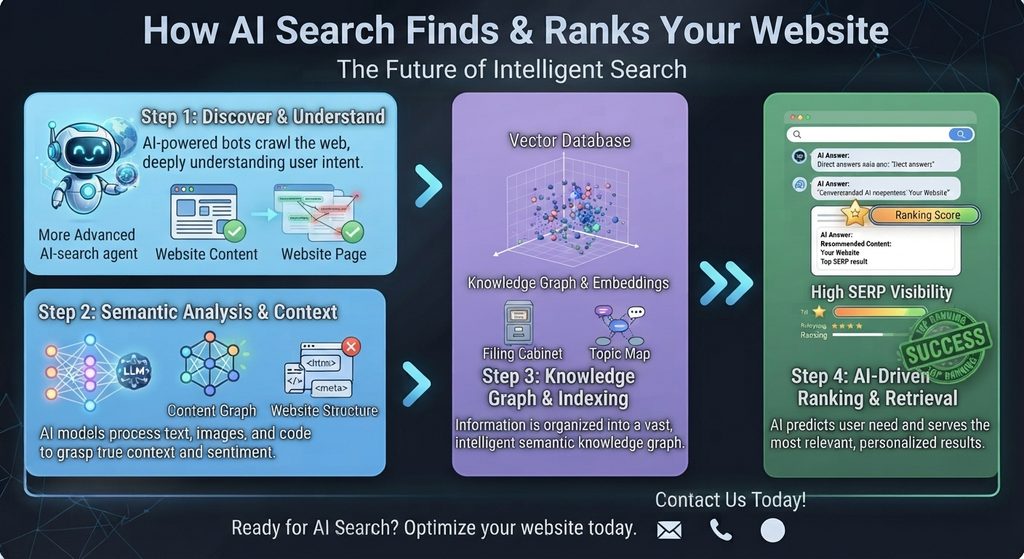
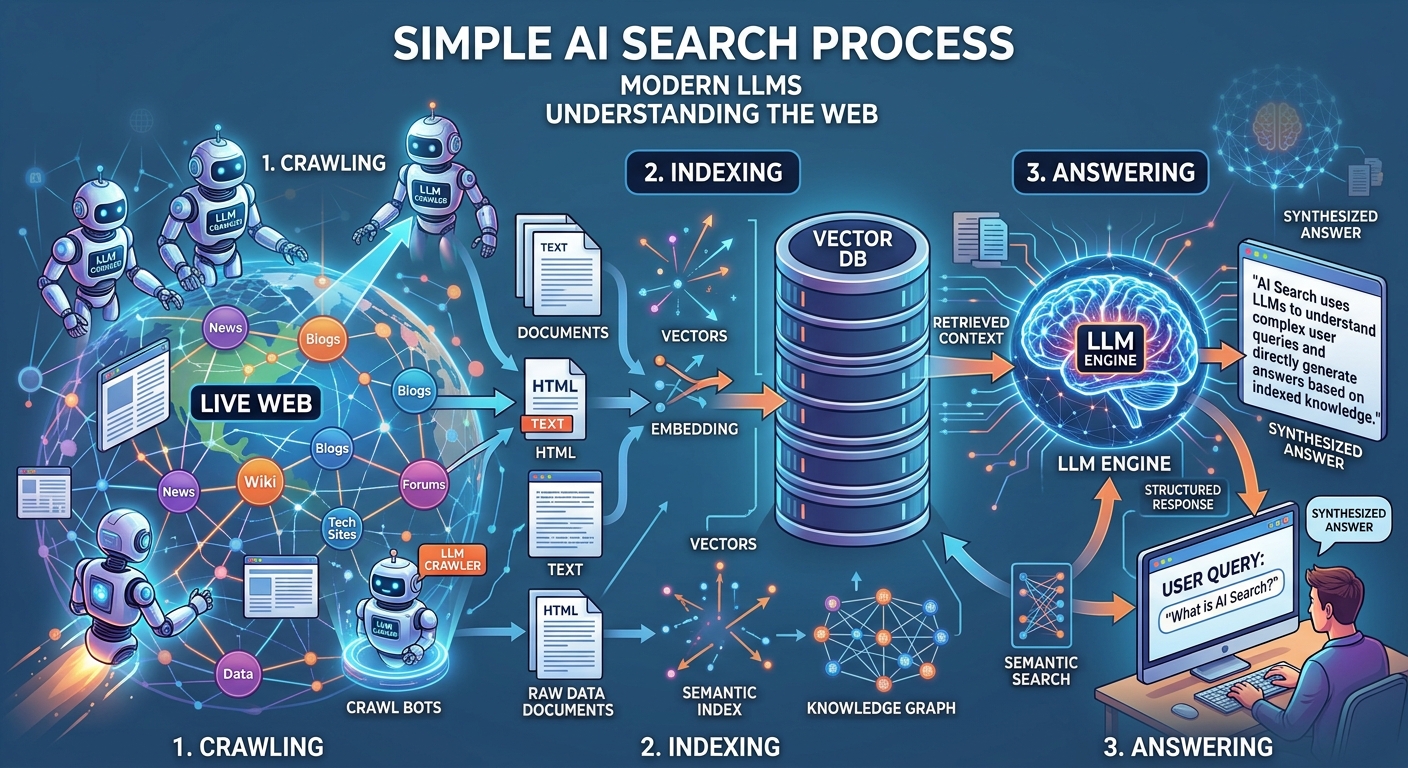
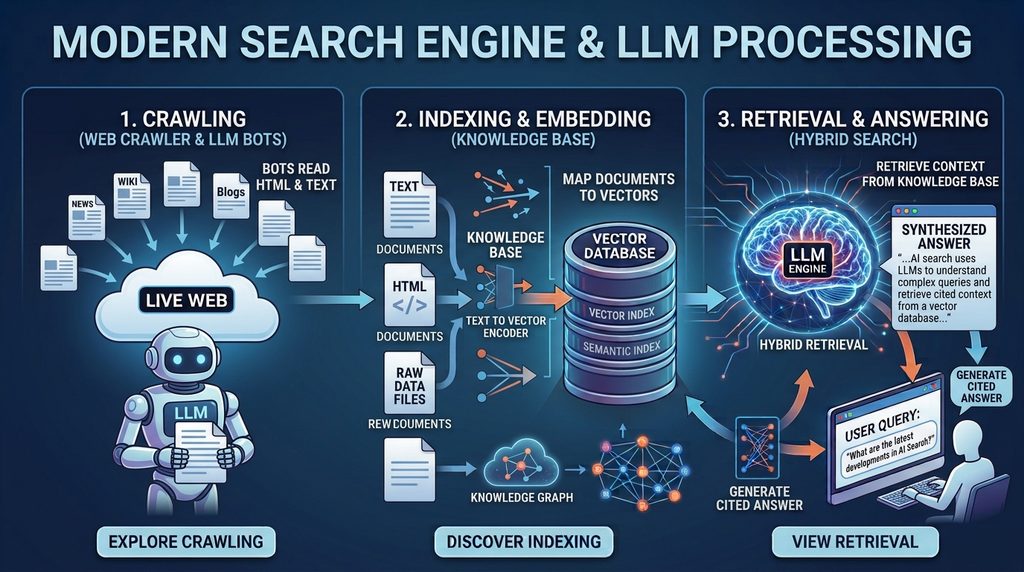
Every AI search tool — Google’s AI Overviews, Perplexity, or a ChatGPT search — follows roughly the same five steps behind the scenes:
Crawl — a bot visits your page and reads the rendered content, similar to classic search, but it pays extra attention to clean HTML structure and structured data.
Chunk — instead of treating your page as one big block, the system splits it into smaller sections (usually 200–500 words) called passages.
Embed — each passage gets converted into a vector: a list of numbers that represents its meaning.
Index — those vectors get stored in a database built for this kind of search, alongside metadata and links to related concepts (a “knowledge graph”).
Retrieve & Generate — when someone asks a question, their question gets turned into a vector too, the system finds the closest-matching passages, and an AI model turns them into one written answer.
Here’s the part that matters most for your content strategy, you’re no longer competing page-against-page. You’re competing passage-against-passage — your one section on shipping costs is competing directly against every other site’s section on shipping costs, not against their whole page.
And this isn’t just theory. Semrush’s tracking shows AI Overviews now show up on roughly 16% of Google searches as of November 2025, after peaking near 25% earlier that year. Even more telling: one study of ChatGPT citations found that pages sitting at position 21 or lower in classic search — well off page one — still got cited almost 90% of the time, as long as the passage itself gave a clear, quotable answer. Ranking on page one still helps, but it’s no longer required to get quoted by an AI.
It also matters which bot is doing the crawling. “AI crawler” isn’t just one bot — it’s several, each built by a different company for a slightly different job:
Crawler
Operator
Purpose
Primary Data Source
Renders JavaScript?
GPTBot
OpenAI
Training-data collection
Live crawl for training
No — server-side HTML only
OAI-SearchBot
OpenAI
Search index / citations for ChatGPT search
Live crawl + Bing’s search index
No
ChatGPT-User
OpenAI
On-demand fetch during a live user session
Training data + live web via OAI-SearchBot
No
ClaudeBot
Anthropic
Training-data collection
Live crawl for training
No
Claude (web search enabled)
Anthropic
Real-time answer grounding
Training data + Brave Search index (Anthropic’s search partner)
No
PerplexityBot
Perplexity
Real-time retrieval at query time
Perplexity’s own real-time index
No
Googlebot (AI Overviews)
Google
Classic crawl, reused for AI Overviews
Google’s own search index
Yes — full rendering
Gemini
Google
Conversational search grounding
Training data + Google’s search index
Varies by surface
Here’s why that’s not just trivia: if you want to show up in ChatGPT, your content also needs to do well in Bing’s index — that’s the live-web source OAI-SearchBot pulls from, not Google’s. Claude works the same way but through Brave Search instead. So a site can be perfectly optimized for Google and still be invisible to someone asking Claude a question with web search turned on.
Here’s the practical takeaway: unlike Googlebot, none of these AI crawlers can run JavaScript. If your main content — the actual text an AI would want to quote — only appears after the page loads via React, Vue, or a similar framework, these bots simply never see it. It doesn’t matter how nice the page looks to a person, or even to Googlebot. Making sure your content is there in the raw HTML (through server-side rendering or a static site) isn’t a nice-to-have for AI search visibility — for these bots, it’s the only thing that works.
This is a distinct problem from Next.js hydration issues, and it’s worth not conflating the two. A hydration mismatch happens when the HTML a Next.js server sends doesn’t match what React expects to render client-side — the content is technically present in the raw HTML that AI crawlers read, but the mismatch can trigger console errors, layout shifts, and in some cases a full client-side re-render that silently swaps the content after load. Since Google’s own crawler does render JavaScript and factors Core Web Vitals like CLS into how it evaluates a page, a hydration mismatch can still hurt AI Overview eligibility even though the AI-only crawlers technically saw the correct initial HTML. Fixing hydration errors and fixing JavaScript-only content injection are two separate audits, and a site can pass one while failing the other.
Information Retrieval Models vs Traditional Indexing
Classic search used something called an inverted index — basically a giant lookup table matching keywords to the pages that contain them. Older ranking systems like TF-IDF or BM25 scored pages mostly by how often and where a keyword appeared, plus how many other sites linked to it.
AI search works differently — it uses dense retrieval. Your question and every passage on the web get placed in the same “meaning space,” and closeness in that space (measured as cosine distance) decides what’s relevant. Two passages can use almost none of the same words and still be treated as a great match, as long as they mean roughly the same thing. That’s how an AI can answer your question using a paragraph that never uses your exact wording.
Most real-world systems don’t pick just one approach — they blend both. This is called hybrid retrieval: combine a classic keyword score (BM25) with a meaning-based vector score, then re-rank the combined results before generating an answer. Knowledge graphs add a third layer on top, linking related concepts together so the system can tell the difference between, say, “Python” the programming language and “python” the snake, based on the surrounding context rather than word similarity alone.
Strategic Implementation & Best Practices for Engineers
Optimizing for AI search means making sure your content and your site’s technical setup survive every step of that five-step process above — not just step one.
Start by giving crawlers clear signals about who wrote the content and what it’s about, instead of leaving the AI to guess from the prose alone:
json
{
  "@context": "https://schema.org",
  "@type": "TechArticle",
  "headline": "What is AI Search? How Modern LLMs Crawl & Index the Web",
  "about": [
    { "@type": "Thing", "name": "Vector Embeddings" },
    { "@type": "Thing", "name": "Knowledge Graphs" },
    { "@type": "Thing", "name": "Information Retrieval" }
  ],
  "proficiencyLevel": "Expert",
  "dependencies": "Vector database, embedding model API",
  "author": {
    "@type": "Person",
    "name": "Tanvir Ahsan",
    "jobTitle": "Enterprise SEO & AI Search Strategist",
    "knowsAbout": ["Generative Engine Optimization", "Vector Search", "Semantic SEO"]
  }
}
Here’s a simple example of what happens behind the scenes. Say you run an online cookware store and want your product pages to show up when someone asks ChatGPT “what’s a good cast iron skillet for beginners.” This Python code takes a product description, turns it into a vector, and stores or searches it — which is basically what an AI search engine is doing to your published pages:
python
import os
from openai import OpenAI
from pinecone import Pinecone

client = OpenAI(api_key=os.environ["OPENAI_API_KEY"])
pc = Pinecone(api_key=os.environ["PINECONE_API_KEY"])
index = pc.Index("cookware-product-catalog")

def embed_chunk(text: str) -> list[float]:
    response = client.embeddings.create(
        model="text-embedding-3-large",
        input=text
    )
    return response.data[0].embedding

def index_product(sku: str, description: str, url: str, entity_tags: list[str]):
    vector = embed_chunk(description)
    index.upsert(vectors=[{
        "id": sku,
        "values": vector,
        "metadata": {"url": url, "text": description, "entities": entity_tags}
    }])

# Example: indexing a product page for AI shopping assistants
index_product(
    sku="CI-SKILLET-10IN",
    description="10-inch pre-seasoned cast iron skillet, ideal for beginners. "
                 "Works on induction, gas, electric, and open flame. "
                 "Naturally non-stick surface that improves with use.",
    url="https://example-cookware.com/products/10in-cast-iron-skillet",
    entity_tags=["cast iron skillet", "beginner cookware", "induction-safe"]
)

def retrieve_top_k(query: str, k: int = 5):
    query_vector = embed_chunk(query)
    results = index.query(vector=query_vector, top_k=k, include_metadata=True)
    return [(match["score"], match["metadata"]["url"]) for match in results["matches"]]

# Example: this is roughly what happens when someone asks an AI
# shopping assistant "best cast iron skillet for a beginner"
retrieve_top_k("best cast iron skillet for a beginner")
Writing in clean, self-contained sections (one idea per 200–400 words, under a clear heading) makes it much easier for this chunking step to pull out your content cleanly. A section that jumps between several unrelated ideas turns into a messy, unclear vector — and messy vectors rarely make it into the AI’s shortlist of best matches.
Edge Cases, Performance Tuning & Scalability
Not every retrieval method performs the same, and the differences get bigger as more people use the system at once. Here’s how the three main approaches compare on a standard test:
Retrieval Method
Recall@10
Mean Reciprocal Rank
Avg. Query Latency
Sparse (BM25 only)
0.61
0.42
8ms
Dense (vector only)
0.78
0.58
35ms
Hybrid (BM25 + vector + re-rank)
0.89
0.71
60ms
Hybrid retrieval gives the best results, but it’s almost twice as slow as vector-only search. That’s exactly why most AI search products only re-rank the top 20–50 candidates instead of the whole index — it’s a balance between accuracy and speed. If you’re building or evaluating one of these systems yourself, that cutoff number is the one setting most worth tuning: too small and you miss good matches, too large and answers start to feel slow.
The end-to-end pipeline, from crawl to generated answer, looks like this:
Looking at the crawler table above, most teams will want control over exactly which AI bots can access which parts of the site — for example, letting the citation-focused bots in while keeping training-only bots away from private or paywalled pages:
At scale, the real bottleneck usually isn’t the embedding model itself — it’s how quickly the index gets updated. If your site publishes a new page but the vector index doesn’t pick it up for hours or days, that page is invisible to AI search during that whole window, no matter how good it is. This is the same underlying problem as render-delay indexing issues, and it’s worth checking how long it actually takes a new page to show up, rather than assuming it’s as fast as classic search.
Worth separating from the indexed-retrieval pipeline above: MCP (Model Context Protocol) is a different pattern entirely. Rather than pre-embedding your content into a static vector index ahead of time, MCP lets an AI agent connect directly to a live tool or data source — a database, an API, a search service — and pull current information at the moment a question is asked. An AI assistant answering through an MCP-connected search tool isn’t matching against a pre-built index at all; it’s querying your system live, the same way a person would call an API. That has a real implication for anything transactional (pricing, inventory, availability): a stale vector index is a known problem with a known fix, but a live MCP connection depends entirely on the underlying service being fast, available, and returning clean, well-structured data on request.
Query Fan-Out: Why One Question Becomes Many Retrievals
A single question rarely turns into just one search behind the scenes. Most AI search systems do something called query fan-out: they break your question into several smaller, related questions, look up passages for each one separately, then combine everything into one answer. Ask “what is AI search and how does it work,” and the system might quietly also search for “vector embeddings,” “retrieval-augmented generation,” and “AI search vs SEO” — then blend all of that into the final response.
What this means in practice: a page that only targets its main keyword is only fighting for a small slice of the opportunity. Content that also answers the obvious follow-up questions around a topic — what it is, how it compares to alternatives, how it actually works — has more chances of getting pulled into the final answer, even when it never directly targets the exact phrase someone typed.
Future Evolution & Measuring Long-Term Organic ROI
AI search doesn’t stay still. The models, the ranking methods, and how citations get decided keep changing at every major provider. That means the old habit of just checking your keyword rankings won’t tell you much anymore — you need to know whether you’re actually being cited.
This is what a specialized generative engine optimization agency focuses on: regularly checking which of your passages are getting picked up, by which AI engines, for which questions — and fixing the ones that aren’t.
Key Performance Indicators & AI Citation Tracking
Regular rank tracking doesn’t work well here, because there’s no fixed position on the page to track anymore. This is really what AI search optimization is about — measuring and improving different signals instead of a rank number.
Citation Share — how often your site actually gets cited in an AI-generated answer (across Google AI Overviews, Perplexity, ChatGPT, and so on), out of all the questions you’re tracking.
Passage Retrieval Rate — how often your specific sections get pulled into the shortlist of candidates, whether or not they end up quoted in the final answer.
Semantic Clustering Coverage — how wide a range of related questions your content shows up for, which tells you how well it covers a full topic instead of just one narrow phrase.
Zero-Click Attribution — the lift in direct traffic or brand searches that comes from being cited, since an AI citation rarely leads to an actual click.
Tracking this well usually needs a dedicated AI search visibility tool — a normal rank tracker has no way to notice that your content got quoted inside a generated answer. Think of it like the difference between “did my ad get clicked” and “did someone mention my product in a conversation they had with a friend” — the second one needs a completely different kind of listening. Purpose-built AI search monitoring tools track citation frequency, passage-level retrieval, and visibility engine-by-engine (Google AI Overviews vs. Perplexity vs. ChatGPT), because a site can be cited constantly in one engine and never show up at all in another, even using the exact same content.
None of this works in isolation from what happens off your own site, either. AI systems look at what other trustworthy sites say about you, not just what you say about yourself — think of it like a job reference. You can write the most impressive résumé in the world, but if nobody else vouches for you, it carries less weight. Mentions and links from relevant publications, a consistent, accurate profile across places like Wikipedia, and genuinely helpful (not promotional) participation in the communities where people discuss your topic — all of that builds the kind of trust an AI system needs before it treats you as a source worth citing. Structuring your content well determines whether it can be found. This off-page trust is a big part of whether it gets believed once it is.
Keeping an eye on these numbers over a 90-day stretch is what separates a page that got lucky once from a site building real, lasting authority.
Ready to Audit Your AI Search Visibility?
If you don’t actually know how often your content gets picked up and cited by AI search engines, you’re flying blind. Start with the Answer Engine Diagnostic ($1,500) for a full check of your citations and passage-level visibility, or scope out a full Enterprise GEO Blueprint for ongoing, long-term authority building.
Frequently Asked Questions
What is the difference between AI search and traditional SEO? Traditional SEO ranks whole pages using keywords and backlinks. AI search picks out individual passages using vector embeddings and meaning-based matching, then blends them into one answer — so the real competition happens at the passage level, not the whole-page level.
How do LLMs decide which sources to cite in an AI Overview? LLMs cite the passages that come back as the closest matches in the vector index, usually after a re-ranking step that blends keyword relevance, meaning-based similarity, and how confident the system is in the source’s authority.
Can a page rank well in Google but be invisible to AI search? Yes, and it happens more than you’d think. Imagine a well-written page that isn’t broken into clear, self-contained sections, or a fast-moving site whose vector index hasn’t caught up with a recent update — either one can rank normally in classic Google search while never once showing up in an AI-generated answer.
What is Generative Engine Optimization (GEO)? GEO means shaping your content, your metadata, and your technical setup so AI systems can actually find and cite it — as opposed to optimizing purely for old-school ranking algorithms.
What is AI search optimization? AI search optimization is the day-to-day work of making sure AI systems can find, understand, and quote your content in their answers. That includes writing in clear passages, adding structured data, making sure AI crawlers can actually see your pages, and regularly checking whether you’re being cited.
How do you track AI search engine citations? You track citations by regularly asking the AI engines you care about — Google AI Overviews, Perplexity, ChatGPT — a set list of questions, and logging whether your site shows up in the answer each time. A normal rank tracker can’t do this, since it has no way to see inside a generated answer.
How do you improve brand visibility in AI search? Break your content into clean, self-contained sections; make sure AI crawlers can actually read your pages (server-side rendering, not just JavaScript); add structured data with clear author and topic signals; and check your citation rate on each AI engine separately, since they don’t all behave the same.
What is query fan-out in AI search? Query fan-out is when an AI system quietly breaks your one question into several smaller related questions, searches for each separately, then combines everything into one answer. For example, asking “how do I train for a 5K” might silently fan out into searches for beginner running plans, injury prevention, and pacing strategy — and content that covers those angles has a better shot at being pulled in, even if it never uses the exact words “train for a 5K.”
Does a Next.js hydration error affect AI search visibility? It can, but differently than a fully JavaScript-rendered page. The content is technically present in the raw HTML AI crawlers read, but a hydration mismatch can cause layout shifts and console errors that hurt Core Web Vitals, which Google’s crawler does factor in when it renders a page for AI Overviews — so hydration bugs and JavaScript-only content injection need separate fixes.
Is ChatGPT a web crawler? No, ChatGPT itself isn’t a crawler. OpenAI operates separate bots for that: GPTBot collects training data, OAI-SearchBot builds the live search index ChatGPT draws from, and ChatGPT-User fetches a specific page in real time only when a live user session needs it. ChatGPT the chat product never crawls the web directly — it relies on those three bots and, for some queries, Bing’s index.
What is MCP (Model Context Protocol) and how does it relate to AI search? MCP lets an AI agent connect directly to a live tool or data source, like a database or API, and pull current information at the moment a question is asked, instead of matching against a pre-built vector index. It matters most for transactional information like pricing or availability, where a static index would otherwise go stale.
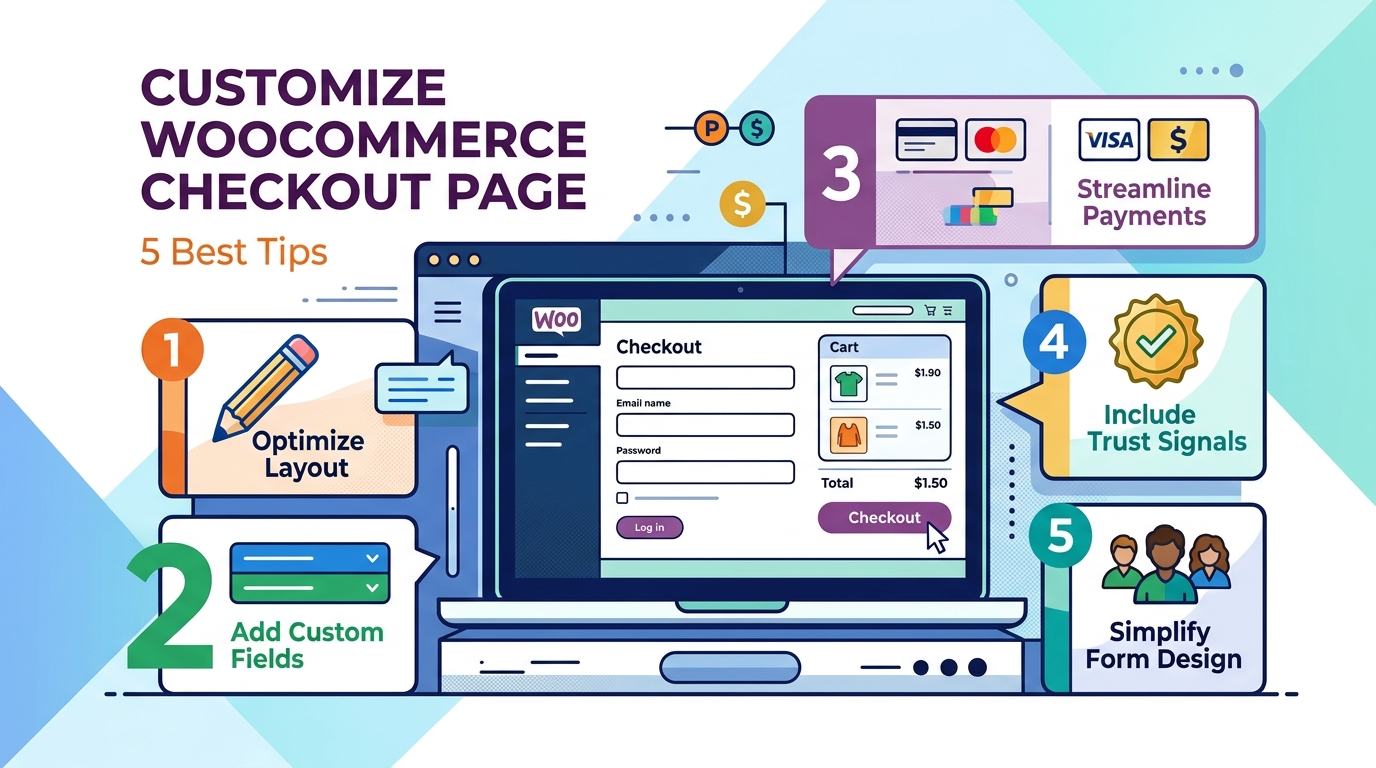
Customizing WooCommerce checkout page means adjusting its form fields, layout, payment options, and trust elements to reduce cart abandonment and increase conversions — and it’s one of the highest-leverage changes an ecommerce store owner can make, because even small friction at this final step costs real sales.
A lot of potential sales are lost right at the checkout page. Shoppers decide to buy, but they leave when they see long forms, confusing layouts, or missing payment options. This guide shows you step-by-step how to fix your checkout page—covering speed, design, trust signals, payment methods, rewards, and legal requirements so you can convert more buyers.
Quick answer: To customize the WooCommerce checkout page, remove unnecessary form fields, enable guest checkout, strip distracting navigation from the page, match the design to your brand, and add relevant trust signals or shipping options. Most of this can be done through the block editor or Customizer, with plugins or child-theme code needed for more advanced changes.
Customizing your checkout page directly improves conversion rate, average order value, and customer trust — three outcomes the default WooCommerce checkout isn’t built to optimize for any specific store.
The default setup works, but “works” and “optimized” aren’t the same thing. Your theme, product type, and customer expectations are unique to your business, so a generic template is never the ideal fit. Checkout customization specifically helps you:
Reduce abandonment caused by long forms, forced account creation, or unclear steps
Increase average order value (AOV) through relevant upsells, add-ons, and bundled offers
Build trust at the exact moment a customer is about to hand over payment details
Capture only the data you need for your specific business model
Grow your marketing list without adding friction to the purchase itself
Each of the following sections tackles one of these outcomes directly, so you can jump to whichever applies to your store.
1. Speed Up the Checkout Flow
A faster checkout flow reduces abandonment because most cart abandonment is a friction problem, not a pricing problem — shoppers leave when the process feels slow or confusing, even when they genuinely intended to buy.
Trim the Form to Only Essential Fields
Removing unnecessary checkout fields is the single fastest way to shorten your form and reduce hesitation. Common fields worth removing or hiding:
Company name
Address line 2
Order notes
Phone number (unless required by your shipping carrier)
You can remove these fields using:
The block editor — Appearance → Editor → Pages → Checkout on a block-enabled theme
The Customizer — Appearance → Customize → WooCommerce → Checkout on non-block themes
A checkout field editor plugin for granular control over billing, shipping, and additional fields
A PHP snippet in your child theme’s functions.php, using the woocommerce_checkout_fields filter, if your checkout still uses the [woocommerce_checkout] shortcode
Always make code-based edits inside a child theme so your changes survive future theme updates — this single habit prevents the most common source of checkout customizations getting silently wiped out.
Remove Header, Footer, and Navigation Distractions
Stripping the header, footer, and navigation from your checkout page keeps shoppers focused on completing their purchase instead of browsing elsewhere. To do this:
Build a dedicated checkout template in the Site Editor (Appearance → Editor → Templates → WooCommerce → Page: Checkout) and delete the header/footer blocks
Use a page builder’s built-in “distraction-free checkout” setting if available
Add CSS or a PHP snippet targeting is_checkout() to hide header and footer elements only on that page
Keep your logo visible for brand consistency; everything else that could lead a shopper away from finishing checkout should be removed.
Confirm your caching plugin or host excludes checkout pages, and follow a dedicated WordPress speed blueprint so your dynamic pages load instantly.
Enable Guest Checkout and Keep Account Creation Optional
Making account creation optional — not mandatory — prevents a well-documented source of abandonment, since a meaningful share of shoppers will abandon a purchase entirely rather than create a new account. Enable guest checkout under WooCommerce → Settings → Accounts & Privacy, while still allowing customers to create an account if they want order history and faster future checkouts.
To keep guest checkout fast without forcing logins, rely on:
Browser-based autofill (Chrome, Safari, and Firefox all support this)
Address autocomplete tools that reduce manual typing
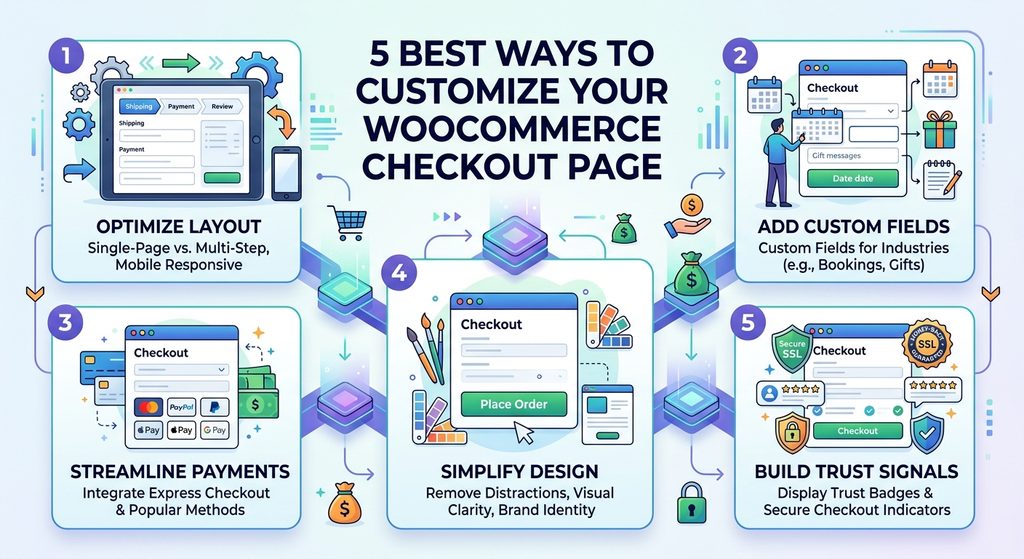
Choosing the right checkout structure — single-page, multi-step, or on-page — depends on your catalog size and order complexity, not on which format is trendiest.
Single-page checkout suits stores with a small catalog or a single-product offer
Multi-step checkout breaks the form into stages (shipping, payment, review), useful for stores collecting more information or dealing with mobile scrolling issues
On-page checkout embeds the form directly on a product or landing page, ideal for single-product stores or ad-driven campaigns
Test what fits your specific catalog — for complex orders, a well-paced multi-step flow can outperform a crammed single page.
Auto-Apply Coupons Instead of Making Shoppers Search for Them
Automatically applying eligible discounts prevents a specific abandonment pattern: a shopper sees an empty coupon field, assumes a discount exists, opens a new tab to search for one, and never returns. Where it makes sense, auto-apply qualifying discounts or clearly display any applicable coupon on the checkout page itself.
Exclude Checkout From Full-Page Caching
Checkout and cart pages must be excluded from full-page caching because they’re dynamic by nature — caching them can cause stale cart contents, incorrect totals, or one customer’s session appearing in another’s browser. Confirm your caching plugin or host excludes checkout, cart, and my-account pages, and separately optimize overall site speed so the non-cached checkout page still loads fast.
Because checkout pages rely heavily on dynamic state management, understanding why server-side rendering mattershelps ensure cart sessions never show stale data.
2. Improve Checkout Page Appearance and Branding
Matching your checkout page’s design to the rest of your store reinforces the trust you’ve built everywhere else on the site — an unstyled, default-looking checkout form undermines that trust right at the final step.
Practical ways to align checkout with your brand:
Match fonts, colors, and spacing to your storefront
Replace field labels with placeholder text to reduce visual clutter
Increase button size and contrast so “Place Order” is unmistakable
Check color contrast and font readability against accessibility standards so the page works for all customers
Most of this can be done with CSS in your child theme’s style.css or the Additional CSS panel in the Site Editor or Customizer.
3. Turn Checkout Into a Loyalty and Satisfaction Touchpoint
Checkout can increase both immediate revenue and long-term retention when it offers real shipping choices, optional add-ons, and thoughtful trust signals — not just a payment form.
Offer Real Shipping Choices
Giving shoppers a genuine choice in shipping speed and cost directly reduces abandonment, since unexpected shipping costs and slow delivery estimates are consistently among the top reasons carts get abandoned. Useful options include:
Free shipping above a set order threshold
A faster, flat-rate expedited option
A delivery date/time picker for local delivery or time-sensitive orders
Add Optional Checkout Add-Ons
Dedicated add-on fields — rather than a generic order notes box — let you offer paid extras while keeping orders organized and trackable. Common examples:
Paid personalization or engraving
Gift wrapping, gift messages, and gift receipts
Rush processing
Optional tips
Show these conditionally, based on cart value or specific products, so the form doesn’t grow for every customer.
Use Trust Signals Deliberately, Not Excessively
Trust badges reassure hesitant buyers only when used sparingly and paired with genuine security — excessive or poorly chosen badges can slow page load and look less credible than a clean checkout with none at all. If you use them, prioritize:
Recognized payment method icons
A concise money-back guarantee or return policy line
A genuine SSL indicator
Test Relevant Upsells Before Committing to Them
Product recommendations at checkout can lift average order value, but only when they’re relevant and optional — otherwise they read as an interruption. Test placement across the cart page, checkout page, and order-received page to see what your audience responds to.
4. Use Checkout as a Marketing Opt-In Moment
An optional email or SMS opt-in checkbox at checkout lets you grow your marketing list without adding friction, since checkout is often the last moment you have a customer’s full attention before they leave your site. Most major email marketing plugins support this natively, placed near the email or phone field.
5. Add Custom Fields for Industry or Legal Requirements
Some businesses need checkout fields beyond the WooCommerce defaults to meet operational or legal requirements:
Booking-based businesses (rentals, accommodations, appointments) may need date pickers, check-in/check-out preferences, or deposit fields
Live-animal or perishable-goods sellers may need shipping disclaimers and delivery-window information
International sellers may need region-specific fields — for example, different return policy text for EU customers than for US customers
A conditional field plugin lets you build these fields once and control exactly when they appear, keeping the form lean for customers who don’t need them.
Common Mistakes to Avoid When Customizing Checkout
Avoiding these mistakes prevents most of the checkout problems store owners run into after making changes:
Hiding fields that are actually required for accurate tax, shipping, or legal compliance
Installing too many overlapping plugins that slow the page down
Skipping mobile testing after every layout change
Treating trust badges as a substitute for real security rather than a complement to it
Guessing instead of testing major changes like one-page vs. multi-step checkout
Final Thoughts
There’s no universal template for the ideal WooCommerce checkout — the right customization depends on your products, your customers, and your industry’s specific requirements. The underlying goals stay constant: remove friction, build trust, and make it effortless for someone who already wants to buy to actually complete the purchase.
Start with the changes that address real friction — a shorter form, guest checkout, a distraction-free layout — then layer in loyalty and revenue-focused touches like add-ons, shipping options, and marketing opt-ins. Test as you go, and your checkout page becomes one of your store’s strongest conversion tools rather than its biggest leak.
WordPress powers over 43% of the web and dominates content marketing SEO. But a question is coming up more frequently as AI search reshapes discovery: does WordPress hold up when GPTBot, PerplexityBot, and ClaudeBot come calling?
The short answer is yes — more naturally than almost any modern alternative. The longer answer is that WordPress’s AI-friendliness is a default that can be systematically degraded by the choices most site owners make without realizing it.
This guide covers exactly how WordPress generates content for AI crawlers, where it holds a structural advantage over JavaScript-first frameworks, what schema capabilities its plugin ecosystem unlocks, and — critically — the specific misconceptions and configurations that quietly undo those advantages.
How WordPress Generates HTML: The AI Crawlability Foundation
WordPress is PHP-based server-side rendering by default. Every time a visitor — or a crawler — requests a WordPress URL, the server runs PHP code, queries the database, assembles the full page HTML, and returns a complete document in the HTTP response.
This is the behavior AI crawlers need. GPTBot, PerplexityBot, ClaudeBot, and OAI-SearchBot all fetch the raw HTTP response and extract whatever content they find there. They do not execute JavaScript. They do not wait for dynamic content to load. What is in the HTML when the response arrives is all they ever see.
WordPress delivers everything in that response: the page title, the meta description, the H1, every paragraph of body content, all heading substructure, navigation links, and — when properly configured — JSON-LD schema markup. A crawler visiting a WordPress page gets a complete content map on the first fetch, every time.
What a WordPress HTTP Response Looks Like to a Crawler
When GPTBot visits a standard WordPress article, the first 50 lines of the HTML response contain:
<title> — the exact post title
<meta name="description"> — the SEO meta description from Yoast or Rank Math
<link rel="canonical"> — the authoritative URL
Open Graph tags — og:title, og:description, og:type
All of this before the crawler has read past the initial <head> section. By the time it reaches the first <h2>, it has already extracted enough to understand the topic, the author, the publication date, and the content type.
This is what server-side rendering means in practice. It is not a technical aspiration — it is the default behavior of every WordPress installation since version 1.0.
The Contrast With JavaScript-First Frameworks
A React application built with Create React App or Vite delivers this to the same crawler:
No title. No meta description. No H1. No content. The crawler reads the file, finds nothing, and moves on.
WordPress’s PHP rendering is not sophisticated or modern by framework standards. But for AI crawlability, it does exactly the right thing — it puts the content in the response.
AI Crawlability Benefits WordPress Delivers by Default
Immediate Full-Content Accessibility
Every post, page, category archive, and tag page on a WordPress site delivers its complete content in the server response. There is no content that requires JavaScript execution to appear. This means:
Training crawlers (GPTBot, ClaudeBot) collect the full text of every published page
Retrieval crawlers (OAI-SearchBot, PerplexityBot) can cite specific paragraphs at query time
Google’s Wave 1 indexing captures everything immediately, without waiting for Wave 2 rendering
For a content-heavy site — the kind of site WordPress is most commonly used for — this is the most important technical fact about the platform.
Semantic Heading Structure
WordPress’s block editor (Gutenberg) enforces semantic heading structure through its editing interface. When a writer uses the Heading block and selects H2, WordPress outputs a proper <h2> tag. When they create a list, it outputs <ul> or <ol>. Tables use <table>.
This matters because AI crawlers parse HTML heading structure to understand content organization. A page with a clear H1 → H2 → H3 hierarchy gives AI systems an explicit content map:
H1: the primary topic of the page
H2: the major sections and the questions each one answers
H3: the specific subtopics within each section
A WordPress post written in Gutenberg with deliberate heading structure is inherently more AI-citable than the same content written as undifferentiated paragraphs — because the structure tells the crawler where each answer begins and ends.
Internal Linking Through Taxonomy
WordPress’s built-in taxonomy system — categories, tags, and custom taxonomies — creates a natural internal link architecture that helps AI crawlers discover and navigate content.
Every published post automatically appears in:
Its category archive page (linked from navigation)
Its tag pages (linked from the post itself)
The main blog index
Any “Related Posts” widgets or blocks
This means new content is immediately linked from multiple existing pages — giving AI crawlers multiple discovery paths without any manual link-building effort. For large sites publishing frequently, this automatic internal linking is a significant crawlability advantage.
XML Sitemap Generation
Yoast SEO and Rank Math both generate XML sitemaps automatically, updating them the moment new content is published. The sitemap includes:
All published posts and pages
<lastmod> dates that update when content is modified
Priority and change frequency signals
Image sitemaps for media-rich content
Accurate <lastmod> dates are particularly important for retrieval-based AI crawlers like PerplexityBot. Freshness is a citation factor — content with recent modification dates is prioritized for real-time AI answers over content that appears stale.
Schema Advantages: WordPress’s Plugin Ecosystem Delivers Structured Data at Scale
Schema markup — JSON-LD structured data — is one of the highest-leverage technical investments for AI visibility. It gives AI systems explicit, machine-readable metadata about content: what type it is, who wrote it, when it was published, what questions it answers.
WordPress’s plugin ecosystem provides schema generation capabilities that would require significant custom development on any other platform.
What Rank Math and Yoast Generate Automatically
Every post published through a properly configured WordPress site with Rank Math or Yoast SEO automatically receives:
BreadcrumbList schema — on every post and page, showing the content hierarchy.
WebSite schema — on the homepage, with SearchAction for sitelinks search box.
These are generated server-side, in the <head> of the HTML response. They reach every AI crawler that visits — no JavaScript dependency, no configuration required beyond the initial plugin setup.
FAQPage Schema — The Highest-Value AI Citation Format
FAQPage schema is the single most citation-friendly schema type for AI systems. It formats content as explicit question-and-answer pairs that AI systems can extract and use directly:
Common Misconceptions About WordPress and AI Search
Misconception 1: “WordPress Is Old Technology, So AI Systems Don’t Trust It”
False. AI systems don’t evaluate the age or technical sophistication of the CMS generating the content. They evaluate the content itself: is it accessible, is it well-structured, is it authoritative, is it accurate?
A WordPress site with excellent content, proper semantic structure, and comprehensive schema markup will be cited by AI systems over a technically sophisticated Next.js site with equivalent content that is poorly structured or schema-deficient.
The CMS is invisible to AI crawlers. The HTML it produces is not.
Misconception 2: “I Need to Rebuild in Next.js to Be AI-Visible”
False — for most WordPress sites. A Next.js rebuild makes sense for specific technical and organizational reasons (discussed in Articles 13 and 14). AI visibility is not one of them, unless your WordPress site has been degraded by JavaScript-heavy page builders, aggressive caching misconfigurations, or performance problems that make it crawl-unfriendly.
A well-configured WordPress site running on quality hosting with WP Rocket and a lightweight theme outperforms many Next.js implementations for AI crawlability — because WordPress’s PHP rendering is consistent and reliable in a way that client-side React is not.
Before planning a rebuild, run the diagnostic tests from Article 3: curl your key pages, disable JavaScript in your browser, check Google Search Console’s URL Inspection tool. If your content is in the HTML response, your rendering architecture is not the problem.
Misconception 3: “More Plugins Means Better AI Visibility”
False — and frequently the opposite. Each plugin adds PHP execution overhead, database queries, and potentially client-side JavaScript. A WordPress site with 40+ active plugins may:
Load slowly enough that crawlers time out before completing the fetch
Fail Core Web Vitals thresholds that affect Google ranking
Inject client-side JavaScript that overwrites or delays content that was already in the server response
Plugin bloat is the most common reason a WordPress site that should be AI-friendly isn’t. The plugin count is not a measure of capability — it is a measure of overhead. Keep the stack lean: one SEO plugin, one caching plugin, one security plugin, one performance plugin. Everything else needs to justify its presence.
Misconception 4: “WordPress Themes Handle SEO Automatically”
Partially true, frequently false. Premium themes from reputable developers (GeneratePress, Kadence, Blocksy, Astra) produce clean, semantic HTML and reasonable default heading structures. Many cheaper or older themes do not.
Specific theme problems that hurt AI crawlability:
Using <h2> and <h3> tags for visual styling rather than content hierarchy
Rendering the post title outside of an <h1> tag — or using multiple H1s
Loading excessive JavaScript from visual builders that slows TTFB
Generating bloated HTML with dozens of unnecessary wrapper divs that bury content
Verify your theme’s HTML output with View Page Source. Check that the post title is in an <h1>, that content headings are in sequential H2/H3 tags, and that the main content appears early in the document — not buried after sidebars, widget areas, or navigation HTML.
Optimization Tips: Making WordPress Maximally AI-Visible
1. Audit Your robots.txt for AI Crawlers
Your robots.txt file may be blocking AI crawlers without your knowledge. Check it directly at yourdomain.com/robots.txt.
The default WordPress robots.txt is minimal and permissive. The problem arises from security plugins (like Wordfence or iThemes Security) that add aggressive disallow rules, or from SEO plugins that block crawlers from admin areas but inadvertently block content paths too.
Ensure these crawlers are explicitly allowed or not blocked:
Astra — widely tested, consistently good semantic output
Avoid for content sites: Divi, Elementor Hello (when used with Elementor), WPBakery-dependent themes. These generate excessive wrapper markup and JavaScript that degrades crawlability.
3. Implement a Complete Schema Strategy
Do not rely on the default schema your SEO plugin generates. Build a deliberate schema stack:
Content Type
Schema Type
Tool
All blog posts
Article
Rank Math / Yoast (auto)
All pages
WebPage
Rank Math / Yoast (auto)
Homepage
Organization + WebSite
Rank Math / Yoast (auto)
All content
BreadcrumbList
Rank Math / Yoast (auto)
FAQ sections
FAQPage
Rank Math FAQ Block
How-to guides
HowTo
Rank Math / Schema Pro
Author pages
Person
Rank Math Author Schema
Validate every schema type at search.google.com/test/rich-results after implementation. Fix every error — schema with errors provides no benefit and can create misleading signals.
4. Configure Caching for Crawler Speed
AI retrieval crawlers (OAI-SearchBot, PerplexityBot) operate in real time. A page that takes 3 seconds to respond may be skipped entirely during a live retrieval fetch.
Target: TTFB under 200ms with caching active.
Minimum caching stack:
Page cache: WP Rocket or LiteSpeed Cache — pre-built HTML served without PHP execution
Object cache: Redis or Memcached for database query results (available on most managed hosts)
CDN: Cloudflare (free tier adequate for most sites) or a managed host’s built-in CDN
With this stack, most WordPress pages can achieve sub-100ms TTFB from cached responses — comparable to static site generation speeds.
5. Write Content That Earns Citations, Not Just Rankings
AI systems don’t just need to access your content — they need to find it worth citing. The technical foundation covered above makes your content accessible. These content practices make it citable:
Answer-first structure: open every H2 section with a direct answer to the implicit question, then elaborate
Short paragraphs: 3–5 sentences maximum — AI systems extract paragraph-sized chunks for citation
Tables for comparisons: structured tabular data is highly citation-friendly
FAQ sections: use Rank Math’s FAQ block to add FAQPage schema automatically
Specific, verifiable claims: AI systems prefer content with concrete details over vague generalities
The WordPress AI Crawlability Verdict
WordPress is not just adequate for AI search visibility — in its properly configured form, it is one of the most AI-crawlable publishing platforms available. PHP-based server rendering, automatic semantic HTML output, comprehensive schema through plugins, and automatic sitemap generation combine to deliver exactly what AI crawlers need on every page request.
The risk is not the platform. The risk is the drift from defaults: plugin accumulation, theme choices that compromise HTML quality, caching misconfigurations, and robots.txt rules that silently block AI crawlers.
Audit those four things on your WordPress site today. If they are clean, your WordPress setup is more AI-visible than most Next.js sites built without deliberate attention to server rendering and schema.
Want to know exactly how AI crawlers are reading your WordPress site right now? The Answer Engine Visibility Diagnostic tests your pages against GPTBot, PerplexityBot, OAI-SearchBot, and ClaudeBot — returning a full HTML accessibility report, schema validation results, and a prioritized fix list. Delivered automatically within minutes.
WordPress’s default configuration is AI-friendly. That is one of its most underappreciated advantages — PHP-based server rendering, automatic sitemaps, semantic heading structure, and plugin-generated schema all work in your favor out of the box.
The problem is that most WordPress sites don’t stay close to their defaults for long. Plugins accumulate. Page builders replace the block editor. Schema gets installed and never validated. Content gets published at volume without depth. Each decision feels reasonable at the time, and each one quietly degrades the AI discoverability of the site.
This article maps the most common WordPress mistakes that hurt AI search visibility — not as abstract warnings but as specific, diagnosable patterns with concrete fixes. Work through each section as a diagnostic: if the mistake describes your site, the fix tells you exactly what to do about it.
Mistake 1: Poor Content Structure
What AI Systems Need From Content Structure
AI crawlers extract meaning from HTML hierarchy. When PerplexityBot or GPTBot reads a page, it processes the heading structure as a content map: the H1 declares the primary topic, H2s mark the major sections, H3s mark the subsections within each. This hierarchy tells the AI system where each answer begins and ends — which sections to extract for which queries.
When that hierarchy is broken, the AI system’s ability to accurately extract and cite content degrades. A page where all the headings are H2s — regardless of their actual content relationship — provides no structural guidance. A page with no subheadings at all is a block of undifferentiated text that an AI system cannot parse into distinct citable answers.
The Most Common Structure Mistakes
Multiple H1 tags. Every page should have exactly one H1 — the primary topic of the page. Some themes render the site name, the post title, and a hero headline all as H1s. Some page builders let editors add H1 blocks wherever they want. The result is a page with three H1s that tells crawlers the page is about three different primary topics simultaneously.
Heading tags used for visual styling. The block editor makes it easy to add a Heading block set to H2 or H3 whenever you want text to look larger. But an H2 that says “Here’s What We Offer” inside a service description block is not a section heading — it is a styled label. AI systems treat it as a section heading anyway, and the false structural signals degrade topic comprehension.
Walls of text with no subheadings. A 2,000-word article written as continuous paragraphs under a single H1 with no H2 sections is structurally invisible to AI systems. There are no landmarks that tell the crawler where the answer to “what is X” ends and the answer to “how do I do Y” begins.
Skipping heading levels. Jumping from H2 to H4, or using H3 before establishing an H2 parent, breaks the hierarchy that crawlers use to understand parent-child content relationships.
The Fix
Every published page should satisfy this structure check before going live:
One H1 per page, matching the primary topic
H2s for every major section — aim for one H2 per distinct question or topic the page addresses
H3s for subsections within H2 sections, used only where the content genuinely subdivides
No heading tags for visual purposes — use bold text or styled paragraph blocks instead
No heading levels skipped
The quickest way to audit your existing content: install the free Accessibility Checker plugin or use the Outline view in the block editor’s document settings panel. Both show the full heading hierarchy at a glance. Any page with multiple H1s or a chaotic heading sequence needs a structural revision before it can compete for AI citations.
Mistake 2: Missing or Broken Schema
Why Schema Matters More for AI Than for Google
For Google, schema markup enhances search results with rich snippets — star ratings, FAQ accordions, recipe cards. Missing schema costs you the visual enhancement but doesn’t necessarily cost you the ranking.
For AI search systems, schema serves a different and more fundamental function. It provides explicit, machine-readable metadata that tells the AI system exactly what type of content this is, who wrote it, when it was published, what questions it answers, and how the content is structured. Without schema, the AI system has to infer all of this from the content itself — and inference is less reliable than explicit declaration.
A page with complete, accurate Article schema, FAQPage schema on its Q&A section, and Author schema with verifiable credentials gives AI systems a confident foundation for citation. A page with no schema forces the AI system to guess — and it may guess wrong, cite the content inaccurately, or skip it in favor of a more explicitly structured source.
The Most Common Schema Mistakes
Relying on theme-generated schema without verifying it. Many WordPress themes add schema markup in their code, but theme schema is often incomplete, outdated, or incorrect. A theme might add @type: WebSite on every page regardless of content type, or generate Article schema without the required author and datePublished fields. You cannot see this by reading your page in a browser — you have to inspect the HTML source or run it through a validator.
Not implementing FAQPage schema on pages with FAQ sections. FAQPage schema is the highest-value schema type for AI citation — it explicitly marks up question-and-answer pairs that AI systems can extract and use directly in generated responses. Every page on your site that has a questions-and-answers section and no FAQPage schema is leaving citation opportunities on the table. In Rank Math, this is a single click: add a FAQ block, fill in the questions and answers, and the schema is generated automatically.
Schema errors left unresolved. Google Search Console’s Enhancements section shows schema errors and warnings across your site. Many sites have had the same schema errors for months or years without ever fixing them. Schema with errors provides zero benefit — broken structured data is not used by search engines or AI systems. It is actively worse than no schema, because it signals that the site’s technical hygiene is poor.
Missing author schema. Author E-E-A-T signals are increasingly important for AI citation decisions. A page whose author has no Person schema, no author bio, and no links to external profiles (LinkedIn, Twitter, professional publications) provides no verifiable credibility signal. AI systems trained on the web recognize entities — people, organizations, publications — that have been consistently mentioned across credible sources. An anonymous page is harder to trust than a page clearly attributed to a verifiable expert.
Duplicate or conflicting schema. Using both Yoast SEO and Rank Math simultaneously — a surprisingly common mistake on sites that switched plugins without fully removing the old one — produces duplicate schema blocks that conflict with each other. AI systems receiving two different @type: Article declarations for the same page may reject both.
The Fix
Immediate actions:
Run every key page through Google’s Rich Results Test. Fix every error before moving on to anything else.
Check Google Search Console → Enhancements for site-wide schema errors. Prioritize by error count and page importance.
Confirm you are running exactly one SEO plugin — Rank Math or Yoast, not both.
Schema implementation by content type:
Page Type
Required Schema
Recommended Addition
Blog posts
Article + Author
FAQPage (if FAQ section exists)
Homepage
Organization + WebSite
All pages
BreadcrumbList
How-to guides
HowTo
FAQPage
Service pages
Service
FAQPage
Author bios
Person
For author schema, create a dedicated author page for each contributor. In Rank Math, enable Author Schema under Titles & Meta → Author Archive. Add a complete bio, upload a photo, and use the sameAs field to link to the author’s LinkedIn, Twitter, and any publication profiles. This is the minimum E-E-A-T signal for AI citation.
Slow pages have a direct and underappreciated impact on AI discoverability — for two distinct reasons.
First, crawl efficiency. AI retrieval crawlers like OAI-SearchBot and PerplexityBot operate in near real time. When a user submits a query, the retrieval system fetches relevant pages within a tight time window. A page that takes 4 seconds to respond may time out before the crawler completes the fetch. The page is simply not included in the answer — not because the content is irrelevant, but because it did not respond fast enough.
Second, Google crawl prioritization. Google’s crawl budget allocation is influenced by page speed. Fast-loading pages get crawled more frequently and more completely. Slow pages get crawled less often, which means content updates take longer to reach the index, freshness signals degrade, and the overall crawl coverage of the site diminishes.
The Most Common Performance Mistakes
Page builders as the content layer. Elementor, Divi, and WPBakery are the most common source of WordPress performance problems. Each renders HTML through a JavaScript rendering layer that adds hundreds of kilobytes of CSS and JavaScript to every page — even pages that don’t use any dynamic features. A typical Elementor page loads 500–800KB of framework assets before delivering any content. A lightweight theme with Gutenberg blocks delivers the same visual result at 50–80KB.
No server-side caching. Without a caching layer, every page request triggers PHP execution and database queries. On a shared hosting plan, this can mean TTFB over 2 seconds before any content is delivered. AI retrieval crawlers hitting an uncached WordPress site during a high-traffic period may consistently time out.
Unoptimized images. Large uncompressed images are the most common cause of poor Largest Contentful Paint (LCP) scores. A hero image at 3MB that hasn’t been converted to WebP and lacks explicit width and height attributes is both a Core Web Vitals failure and a crawler friction point — the crawler must wait for the full response before it can complete parsing.
Render-blocking scripts in <head>. Third-party scripts — analytics, chat widgets, advertising tags, heatmap tools — loaded synchronously in the <head> block HTML parsing until the script downloads and executes. Every millisecond of blocking adds to TTFB and reduces the crawling efficiency of every bot that visits the page.
The Fix
Minimum viable performance stack for WordPress:
Page caching: WP Rocket or LiteSpeed Cache — pre-built HTML served without PHP/database overhead. This alone typically cuts TTFB by 60–80%.
Object caching: Redis or Memcached for database query results — available on most managed WordPress hosts (WP Engine, Kinsta, Cloudflare) at no extra cost.
CDN: Cloudflare (free tier) for static asset delivery from edge nodes globally. Reduces asset load time for international crawlers.
Image optimization: ShortPixel or Imagify for compression and WebP conversion. Add explicit width and height attributes to all images to eliminate layout shift.
Target metrics before considering yourself performance-optimized:
Metric
Target
Tool to Measure
Time to First Byte (TTFB)
Under 200ms (cached)
GTmetrix, WebPageTest
Largest Contentful Paint
Under 2.5s on mobile
PageSpeed Insights
Cumulative Layout Shift
Under 0.1
PageSpeed Insights
Total page weight
Under 500KB
GTmetrix
If your site fails any of these on mobile with a throttled connection, AI retrieval crawlers on congested networks are experiencing worse conditions than your test environment shows.
Mistake 4: Plugin Bloat
The Hidden Cost of Every Plugin
Every active WordPress plugin is code that runs on every page request. Even plugins that appear passive — a backup plugin, a social sharing plugin, a contact form plugin — execute PHP on every load, potentially add database queries, and often enqueue JavaScript and CSS to the frontend.
A WordPress site with 40 active plugins is not a site with 40 features. It is a site where 40 separate codebases interact on every page load, with unpredictable performance implications, security surface area proportional to the combined vulnerability history of all 40 projects, and maintenance overhead for 40 separate update cycles.
For AI discoverability specifically, plugin bloat creates problems in three ways: it slows page load (see Mistake 3), it can inject client-side JavaScript that interferes with the server-rendered HTML that crawlers rely on, and it introduces schema conflicts when multiple plugins try to manage structured data simultaneously.
The Most Common Plugin Bloat Mistakes
Installing plugins speculatively. “I might need this” is not a reason to install a plugin. Every plugin should be installed because it solves a specific, active problem that cannot be solved another way.
Keeping deactivated plugins installed. Deactivated plugins still represent security vulnerabilities — their files are on the server, accessible to scanners, and subject to being re-enabled by a compromised admin account. If you are not using a plugin, delete it.
Functional overlap between plugins. The most common overlap patterns:
Two SEO plugins (Yoast + Rank Math, or either alongside All in One SEO)
Two caching plugins (WP Rocket + W3 Total Cache + LiteSpeed Cache)
SEO plugin schema + dedicated schema plugin + theme schema — three systems generating conflicting structured data
Using heavy plugins for simple tasks. A full page builder to create a simple About page. A complete e-commerce plugin to sell one digital product. A full membership plugin to restrict one page. Each of these replaces a simple solution with a complex one that loads its full framework on every page of the site.
The Fix
The quarterly plugin audit:
Go to Plugins → Installed Plugins. For each active plugin, ask three questions:
What specific problem does this plugin solve?
Is that problem still active on this site?
Is there a lighter-weight way to solve it?
Delete anything you cannot answer question 1 for. Deactivate and delete anything you cannot answer question 2 for.
The lean plugin stack for an AI-optimized WordPress site:
Function
Plugin
Why This One
SEO + Schema
Rank Math (free)
Covers SEO, schema, sitemap in one
Performance
WP Rocket
Page + object + browser caching
Image optimization
ShortPixel
Compression + WebP, minimal overhead
Security
Wordfence (firewall only)
Firewall without frontend JS
CDN
Cloudflare (plugin)
Free tier sufficient for most sites
Five plugins. One function each. No overlap.
Mistake 5: Thin Content
Why Thin Content Is an AI Discoverability Problem Specifically
Thin content — posts that are too short, too generic, or too vague to thoroughly answer any specific question — has always been an SEO problem. For AI discoverability, it is a more acute one.
AI systems selecting sources for citation apply an implicit quality filter: is this content specific enough to be useful as a cited source? A 300-word post that says “server-side rendering is important for SEO” provides nothing citable that isn’t already in the AI model’s training data. A 2,000-word post that explains exactly how SSR affects crawl budget allocation, with specific metrics and implementation examples, gives the AI system something concrete to reference.
The threshold for AI citation is higher than the threshold for Google ranking. Google can rank a page because it matches keyword intent and has backlinks. AI systems cite pages because the content provides specific, verifiable, expert-level answers that the model wants to attribute to a credible source. Thin content clears the first bar but not the second.
The Most Common Thin Content Mistakes
High publishing frequency, low information density. Publishing five 400-word posts per week creates the appearance of an active content operation while building zero topical authority. AI systems do not reward publishing frequency — they reward depth and specificity.
Generic category and tag pages with auto-generated descriptions. WordPress automatically creates archive pages for every category and tag. Without custom content, these pages display a list of post titles and nothing else — a page with no substantive content that provides nothing for crawlers to cite.
Duplicate product or service descriptions. Sites that copy manufacturer descriptions, or that use the same boilerplate paragraph across multiple service pages with only the city name changed, are creating content that AI systems classify as duplicated and low-value. AI models are trained on the web — they recognize template text.
Posts that answer a question at a surface level. “What is server-side rendering?” answered in 200 words that define the term without explaining how it works, when to use it, or what its alternatives are is a thin answer. The same question answered with a comparison table, code examples, a discussion of tradeoffs, and a checklist for implementation is a citable resource.
Content that doesn’t take a position. AI systems are more likely to cite content that makes specific, verifiable claims than content that hedges everything. “It depends” is not a citable answer. “For content sites with non-technical publishing teams, SSG is the better choice in most cases because…” is.
The Fix
Audit before you publish more. Before writing another article, run a content audit on what already exists:
Export your post list with word counts (Screaming Frog can do this automatically)
Flag every post under 800 words
For each flagged post, decide: expand it to comprehensive depth, merge it with a related post, or redirect it to a better piece and delete it
For category and tag pages above a traffic threshold, add a 200–300 word introduction that provides genuine context for the category
The depth standard for AI-citable content:
A post ready for AI citation should be able to answer yes to all of these:
Does it answer one specific question more thoroughly than any competing page?
Does it include at least one concrete, specific piece of information that can’t be found in a generic definition?
Does it have a clear structure (H2 sections) that lets AI systems extract specific sections for specific queries?
Does it make at least one specific, verifiable claim — a metric, a recommendation, a comparison — that an AI system would want to attribute to a source?
If any answer is no, the post is not yet ready to compete for AI citations regardless of its word count.
The Common Thread
Every mistake in this article has the same root cause: drifting from WordPress’s defaults without understanding what those defaults were protecting.
WordPress’s defaults — PHP server rendering, semantic block editor, lightweight theme HTML, one SEO plugin for schema, reasonable plugin counts — combine to produce a site that AI crawlers can read completely, understand structurally, and cite confidently.
Every plugin added, every page builder chosen, every schema left unvalidated, every thin post published is a step away from that default and a step toward a site that AI systems can access but not cite.
The fix is not a technical overhaul. It is a quarterly audit habit: check the heading structure, validate the schema, measure the performance, review the plugin list, assess the content depth. Do this four times a year and WordPress will stay close enough to its defaults to remain one of the most AI-friendly publishing platforms available.
Not sure which of these mistakes are affecting your WordPress site right now? The Answer Engine Visibility Diagnostic runs an automated check across all five categories — content structure, schema validation, performance, crawl access, and content depth — and returns a prioritized fix list. Delivered within minutes, no discovery call required.